The Anchor Strategy
A procedural workflow for locking down spatial geometry and aesthetic variables across multiple generative outputs.
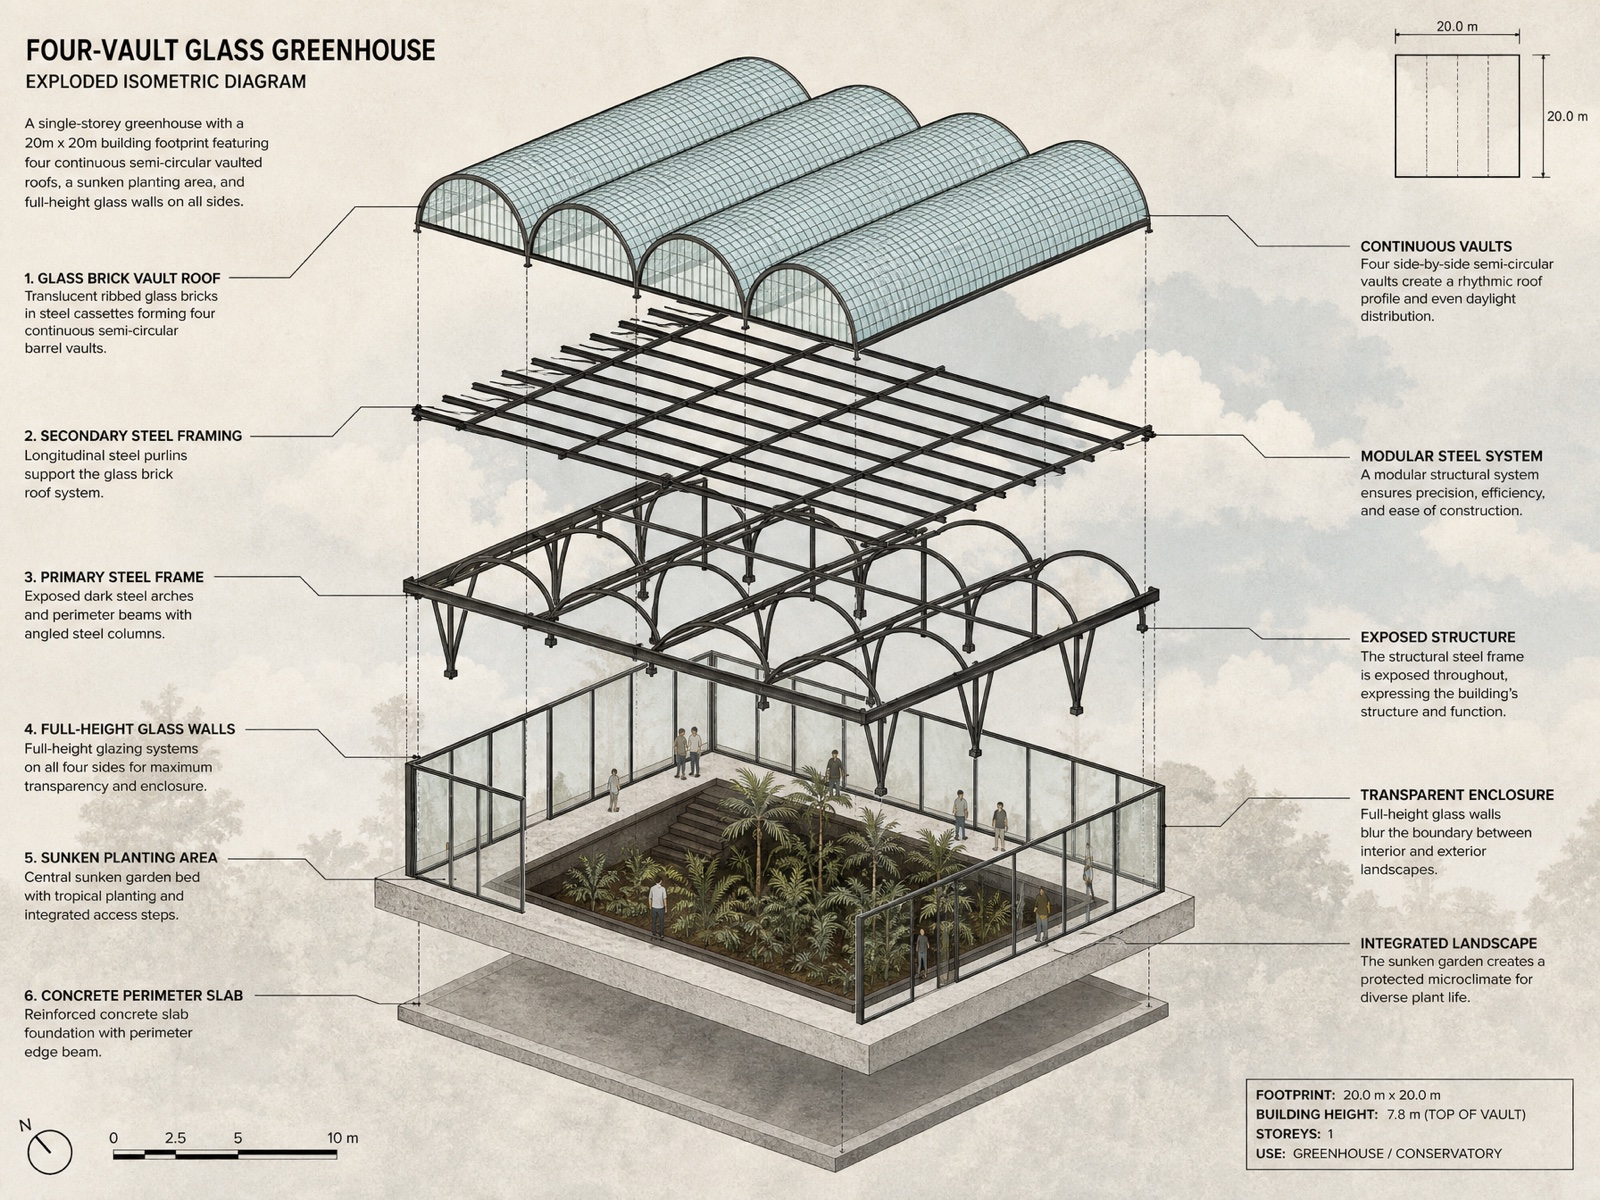
One project, one geometry: a four-vault glass greenhouse held consistent across master shots, interiors, sections, and exploded diagrams. All outputs generated with gpt-image-2.
Getting a generative model to produce a single, compelling early-stage massing option is trivial. Getting it to hold that exact same geometry across an interior view, an exploded isometric, and a construction section is notoriously difficult.
Without a rigid structural methodology, the model treats each prompt independently, resulting in melted architecture and shifting geometries. The solution is the Anchor Strategy: a controlled process of establishing a primary truth, validating it with a secondary truth, and using those constraints to govern the rest of the drawing set.
This workflow is not meant to replace the rigorous architectural process, strict CAD modelling, or physically accurate BIM rendering. AI outputs inherently carry imperfections, hallucinations, and spatial inconsistencies. Generative tools are useful for rapid ideation and stylised diagramming, but traditional CAD and professional architectural judgment still go a long way. They remain the final arbiters of constructability and spatial truth.
Establish a truth, validate it, then govern the set.
Define the global variables
Before generating a single image, you must define the constraints. Write down the exact building footprint, the structural logic, the material hex codes, and the art style. Do not leave room for the model to guess the aesthetic.
- →Footprint: e.g., 20m x 20m.
- →Structure: e.g., four continuous side-by-side semi-circular glass vaults.
- →Palette: e.g., #2B2B2B dark matte steel, #A0D2DB translucent glass.
- →Style: e.g., post-digital architectural collage, flat paper textures.
Shortcut the process: the skill file
You do not need to rewrite prompts from scratch every time. The most efficient way to manage this workflow is by using a dedicated skill Markdown (.md) file. This file acts as your master template, pre-loading the AI with all your required camera angles, architectural drawing types, and shot lists.
By feeding the AI your skill file along with your initial design references, you effectively train the model on your specific project. It learns to extract your global variables from a single reference image and automatically maps those exact design specs, footprints, and texture palettes across its pre-generated list of shots. This ensures the prompt it writes for a master perspective is mechanically consistent with the prompt it writes for a macro detail shot.
Generate the primary anchor
Your first output is the primary anchor. This is usually the master exterior shot(like a central one-point perspective). This image establishes the baseline truth of the project's massing, light, and material application.
Do not move on until this single image perfectly reflects your global variables. If the primary anchor is flawed, every subsequent image will inherit those flaws.
Generate the supporting anchor
Once the primary anchor is locked, you must immediately generate the supporting anchor. This is typically the interior spatial shot or a cross-section.
The goal here is verification. You are testing if the logic established in the primary anchor holds up from the inside out. It is critical to ensure that these two main anchors are as consistent with each other as possible. Look at the structural junctions, the repetition of the vaults, and the scale figures. If the interior contradicts the exterior footprint, you must refine your global variables and re-prompt.
Expand the drawing set
Only after the primary and supporting anchors are visually reconciled do you move on to the rest of the set. Because the model has now learned the strict parameters through your repeated refinement of the anchors, you can safely branch out into technical diagrams.
Using the exact same variable text block structured by your skill file, you can now generate:
- →Exploded axonometric diagrams
- →Tri-style transition views (line work to render)
- →Facade assembly details
- →Site analysis overlays
The prompt does not do the design thinking.
It simply enforces the architectural logic so the outputs can actually support a real consultant or client conversation.