I stopped drawing wall types. I started building them.
A wall type schedule that knows a 90mm batt will not fit a 64mm stud. Built in one session, without writing a line of code.
Wall types eat my week.
Every project. The same job.
Redraw the same partition for the fifth time. Add up the thickness by hand. Chase an FRL through a manufacturer's book. Copy a schedule out of the last job and hope nobody changed the stud since.
It is not hard work. It is just slow, repetitive, and easy to get quietly wrong.
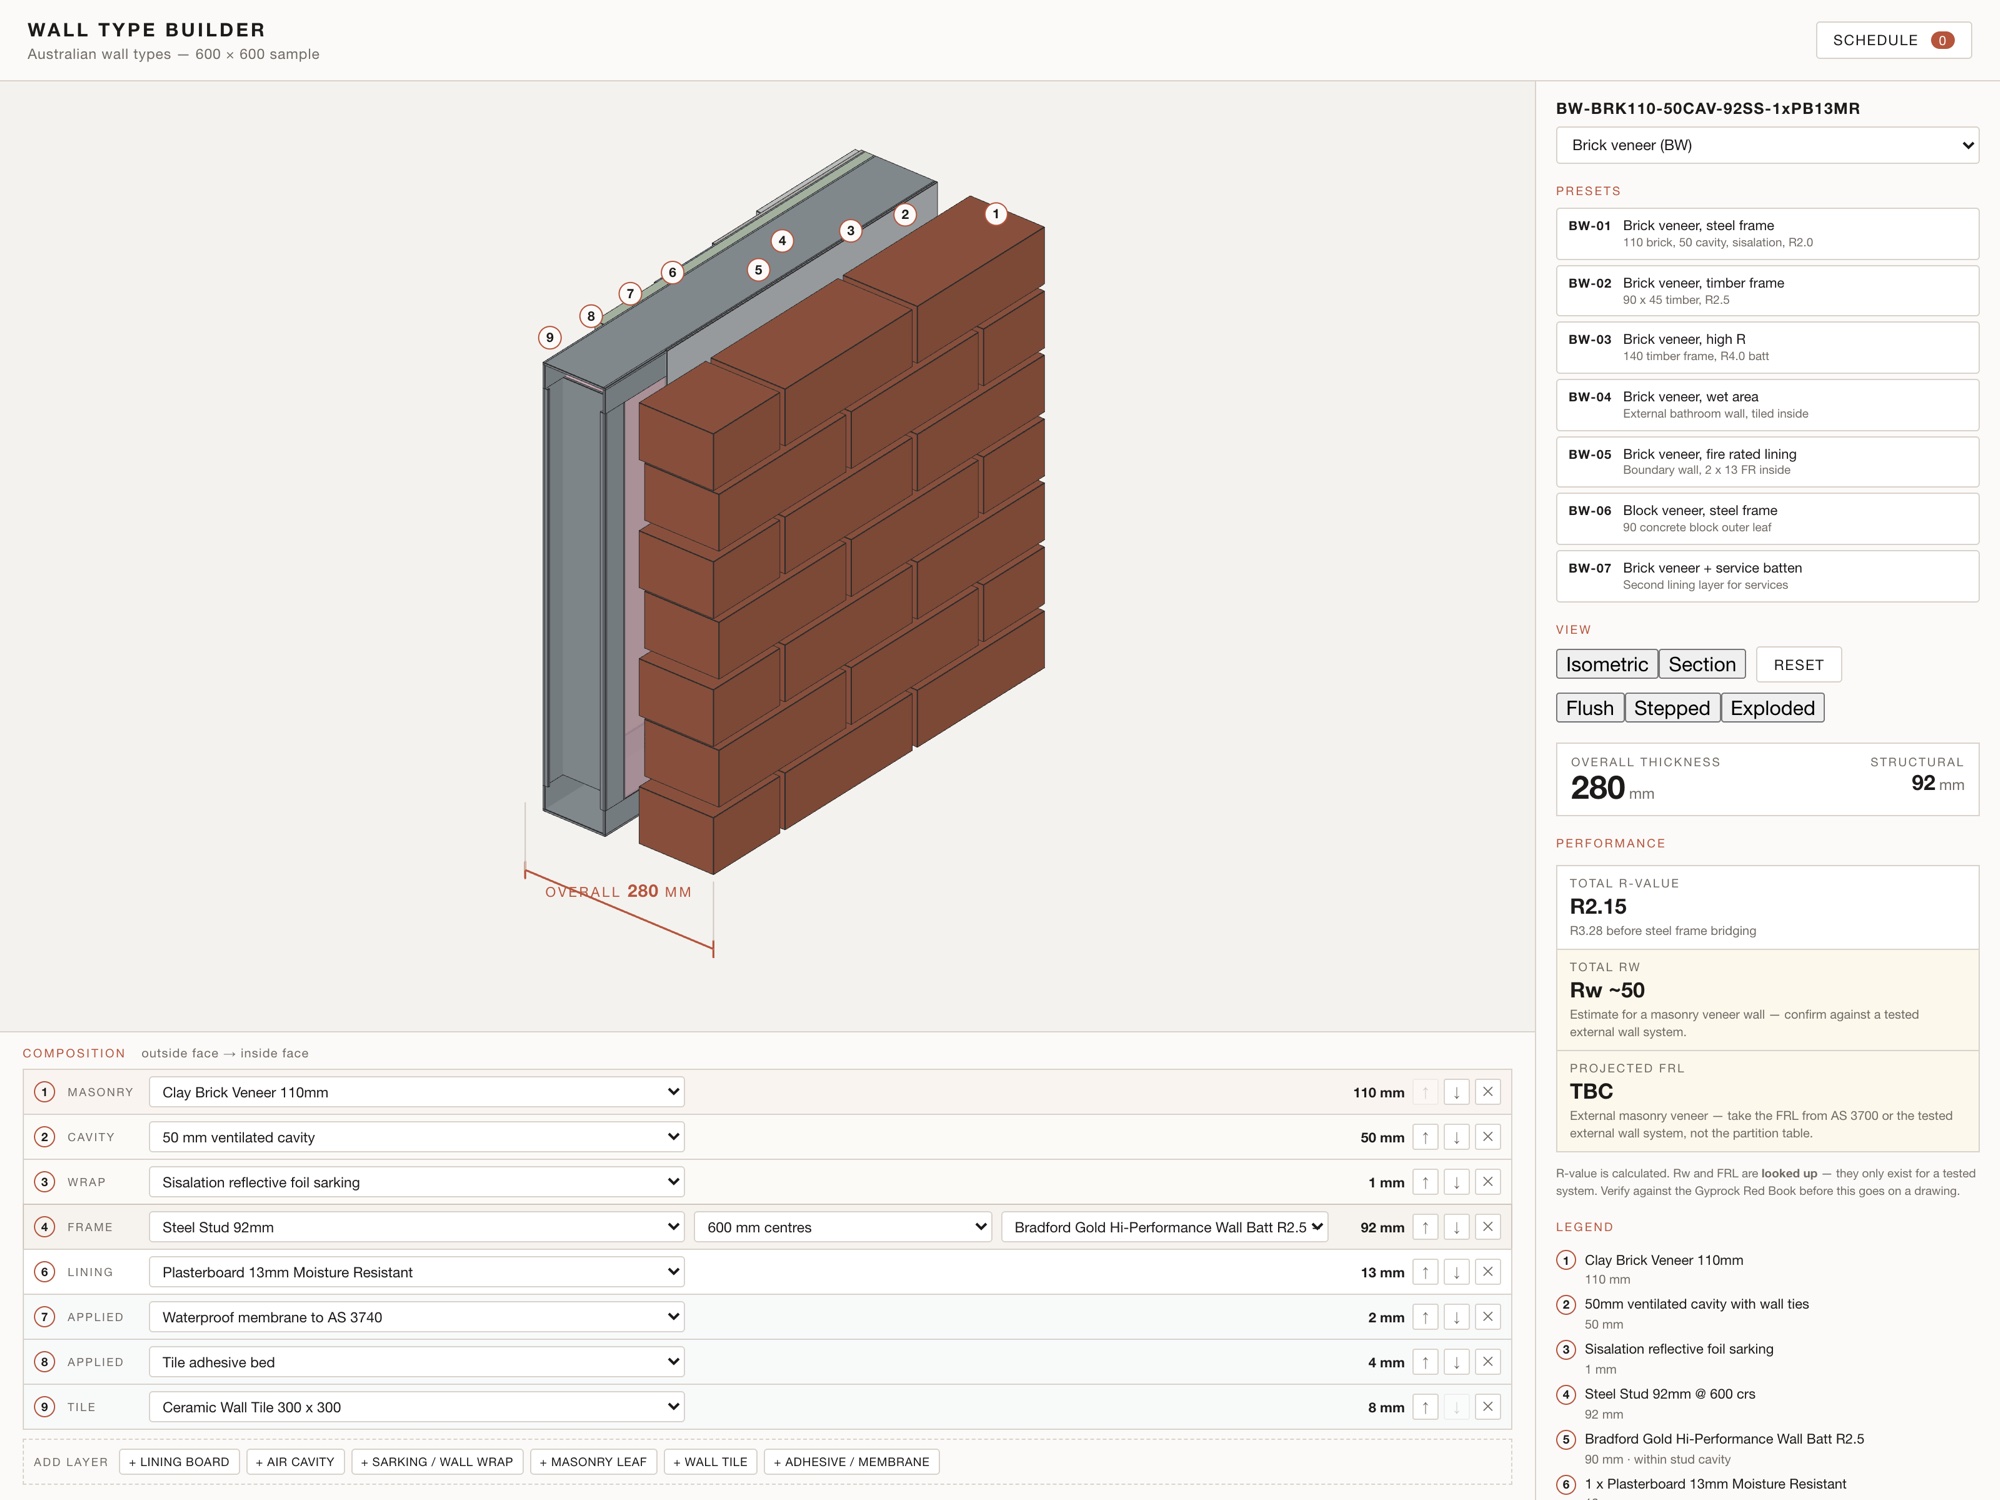
So I built a tool that does it. It draws the wall in 3D, sums the thickness, works out the R-value, and exports a schedule I can put on a drawing.
Then I made it refuse to guess the fire rating. That part matters more than all the rest.
Two things before we start
- Save this. The 5 checks below are worth 10 minutes even if you never build a thing.
- Send it to the person in your office who owns the wall type sheet. They will recognise every trap.
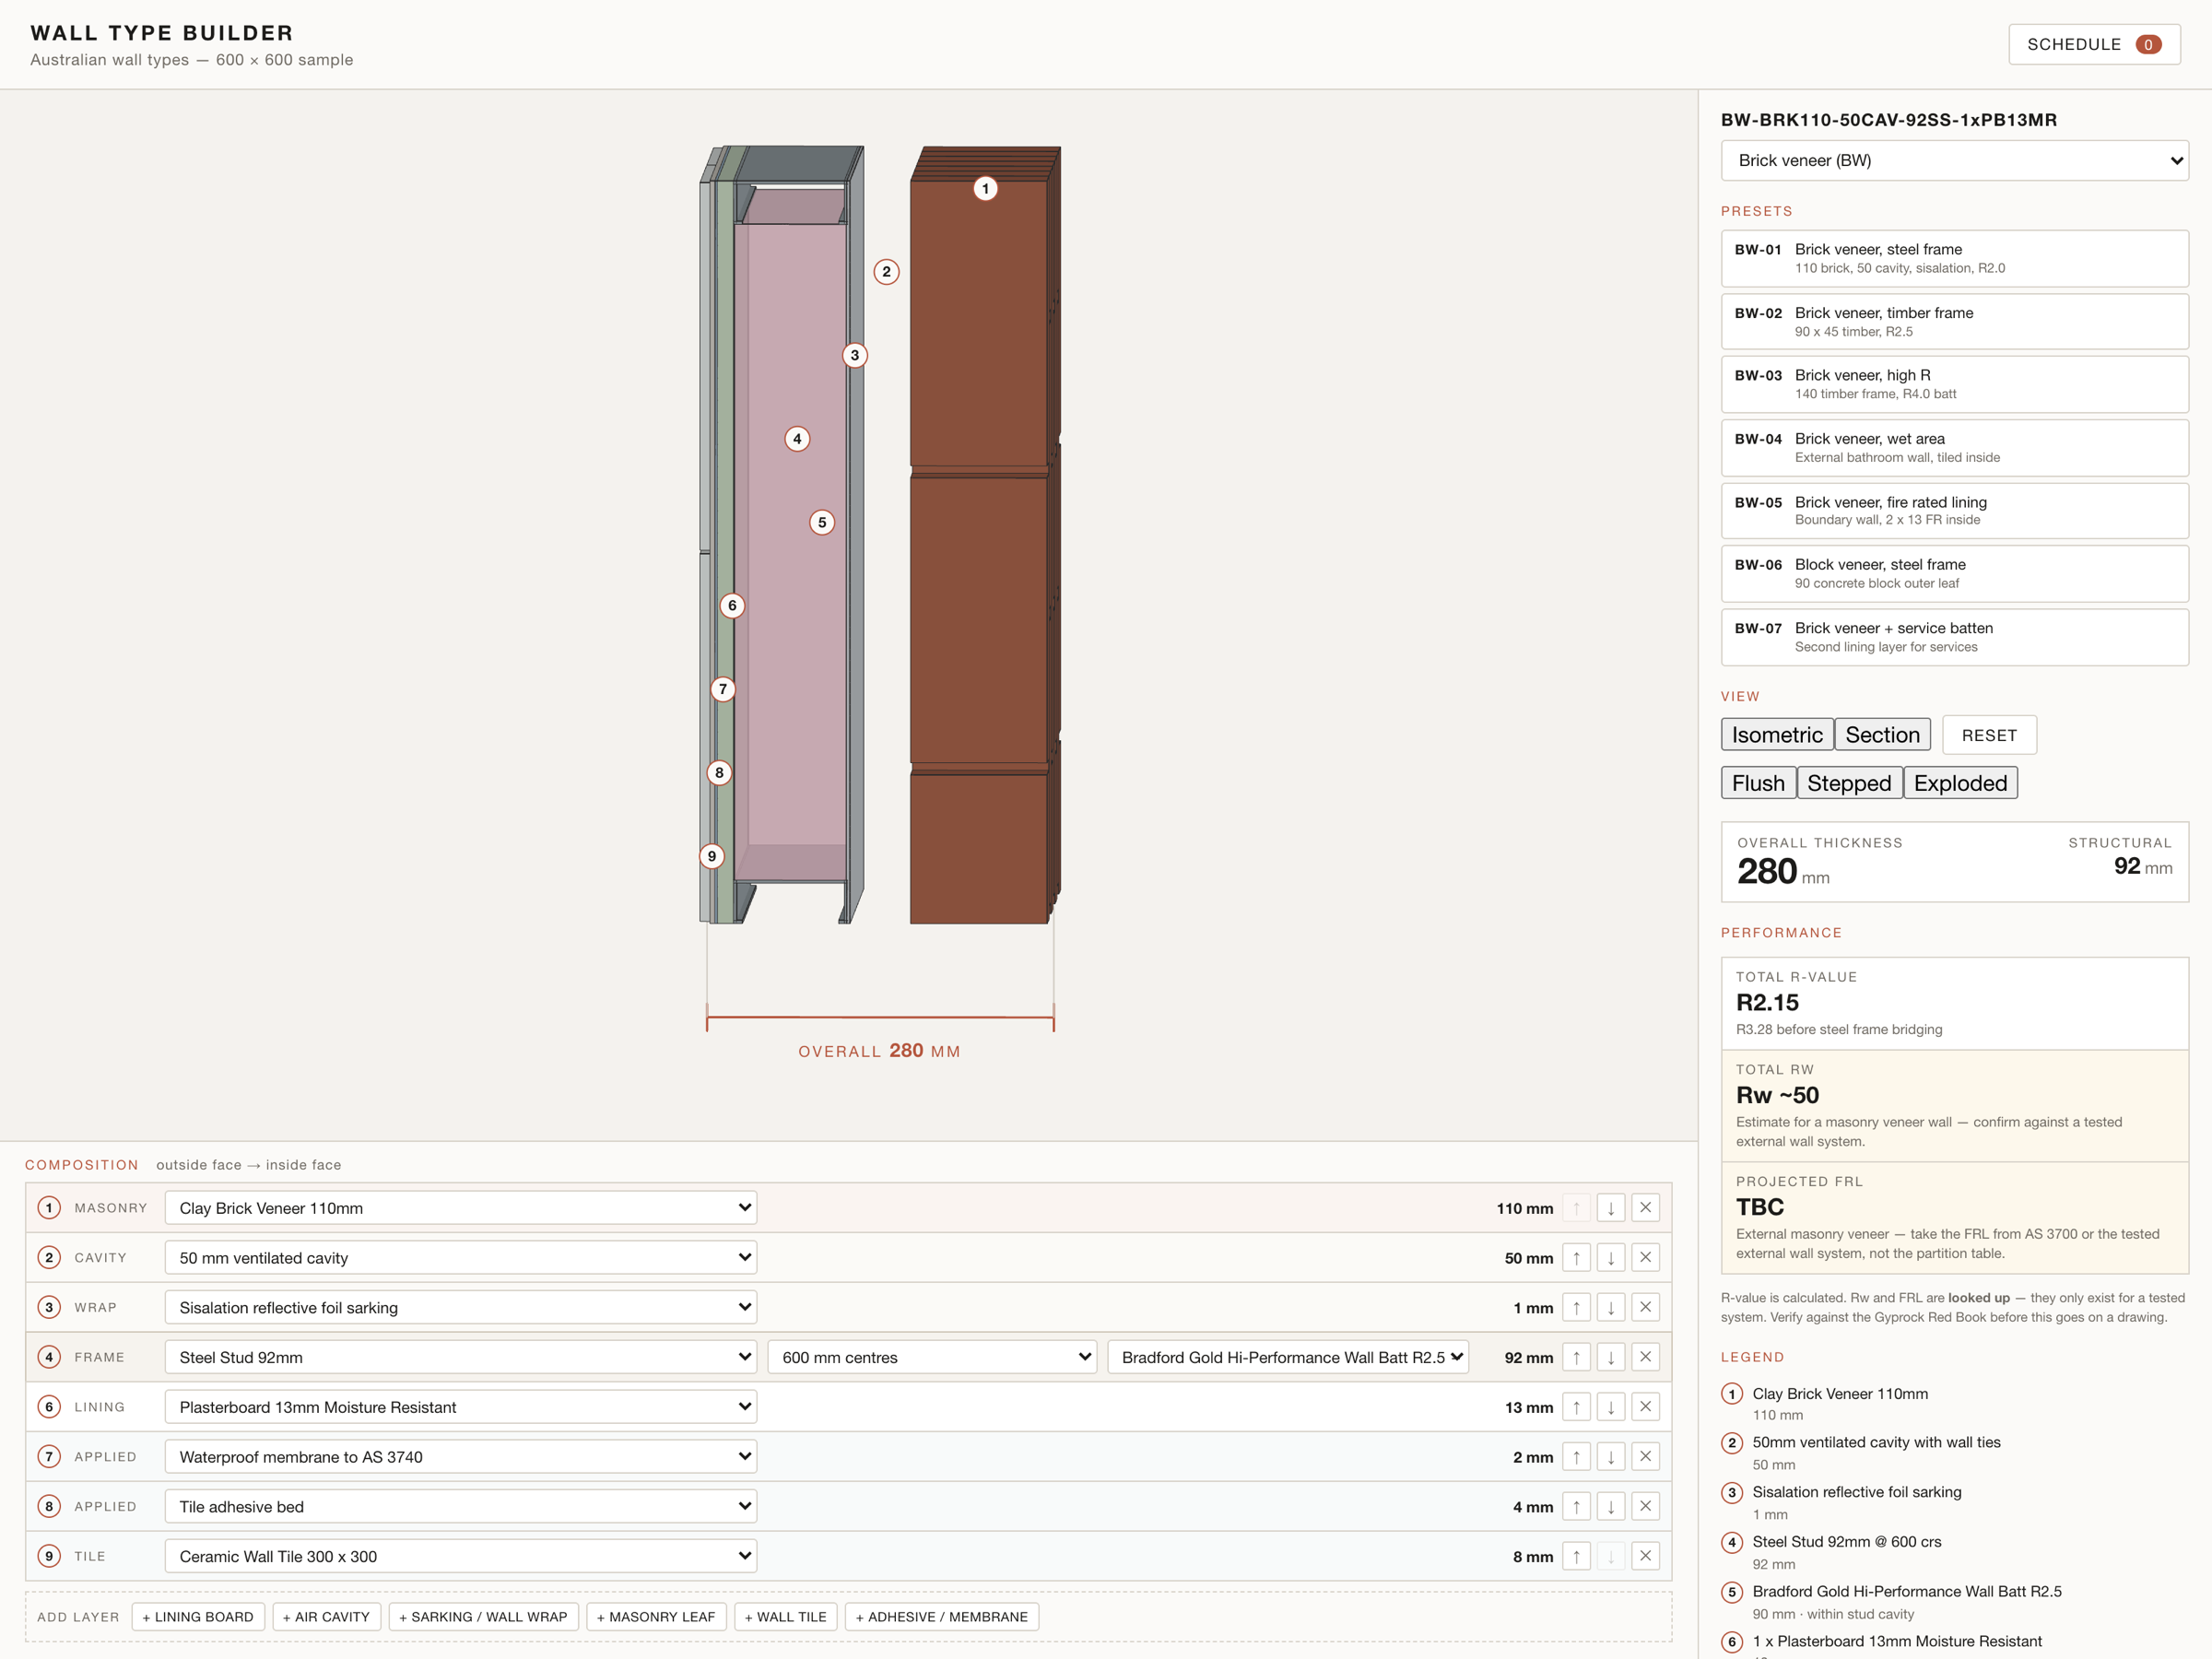
A 92mm steel stud partition, 2 layers of 13mm each side, and its brick veneer cousin: 110mm brick, 50mm cavity, sisalation, 92mm steel stud with an R2.0 batt, 13mm lining. Both are ordinary Australian walls. Both are on almost every job I do.
Check 01The frame: steel or timber, and the NCC decides
Like choosing between a steel and a timber beam. Same span, completely different rulebook.
This is the first decision and the one people make out of habit.
Steel or timber is not a preference. It follows the construction type. Where the NCC requires elements to be non-combustible, steel studs are how you get there. In Class 1 housing, a 90 x 45 timber stud to AS 1684 is the everyday answer.
Pick the wrong one early and it does not surface as a code problem. It surfaces as a thickness problem, three weeks later, when a 90mm timber frame will not sit in the 92mm space you dimensioned.
Use it for: setting the frame once, at the top of the job, and letting every wall type inherit it.
I am setting up wall types for a [building class, eg Class 2 apartments] project in [state], construction type [A / B / C].

Tell me which framing options are actually available to me for internal partitions and for the external wall, and why, referencing the NCC provisions that drive it.

Then list, for each option:
- the common stud depths used here
- the standard the framing is designed to
- what it does to my overall wall thickness

Do not recommend a product. If a provision depends on something I have not told you, ask me for it.
The one mistake: choosing the stud because that is what the last job used. The last job may have been a different construction type.
Check 02The linings: one row per sheet
Like a schedule of finishes. Every layer is a line item, or it is not really specified.
13mm standard is the default. Moisture resistant board goes in wet areas. Fire grade board goes where an FRL asks for it, and nowhere else, because it costs money and adds nothing you need otherwise.
In my tool, every sheet is its own row. Two layers is two rows, not a "2x" in a description. That sounds pedantic until you have to work out why one face is 26mm and the other is 13mm.
It also means the faces can differ, which is normal on a wet area wall and which matters enormously once you get to fire.
Use it for: pricing, ordering, and knowing exactly what a builder is meant to hang.
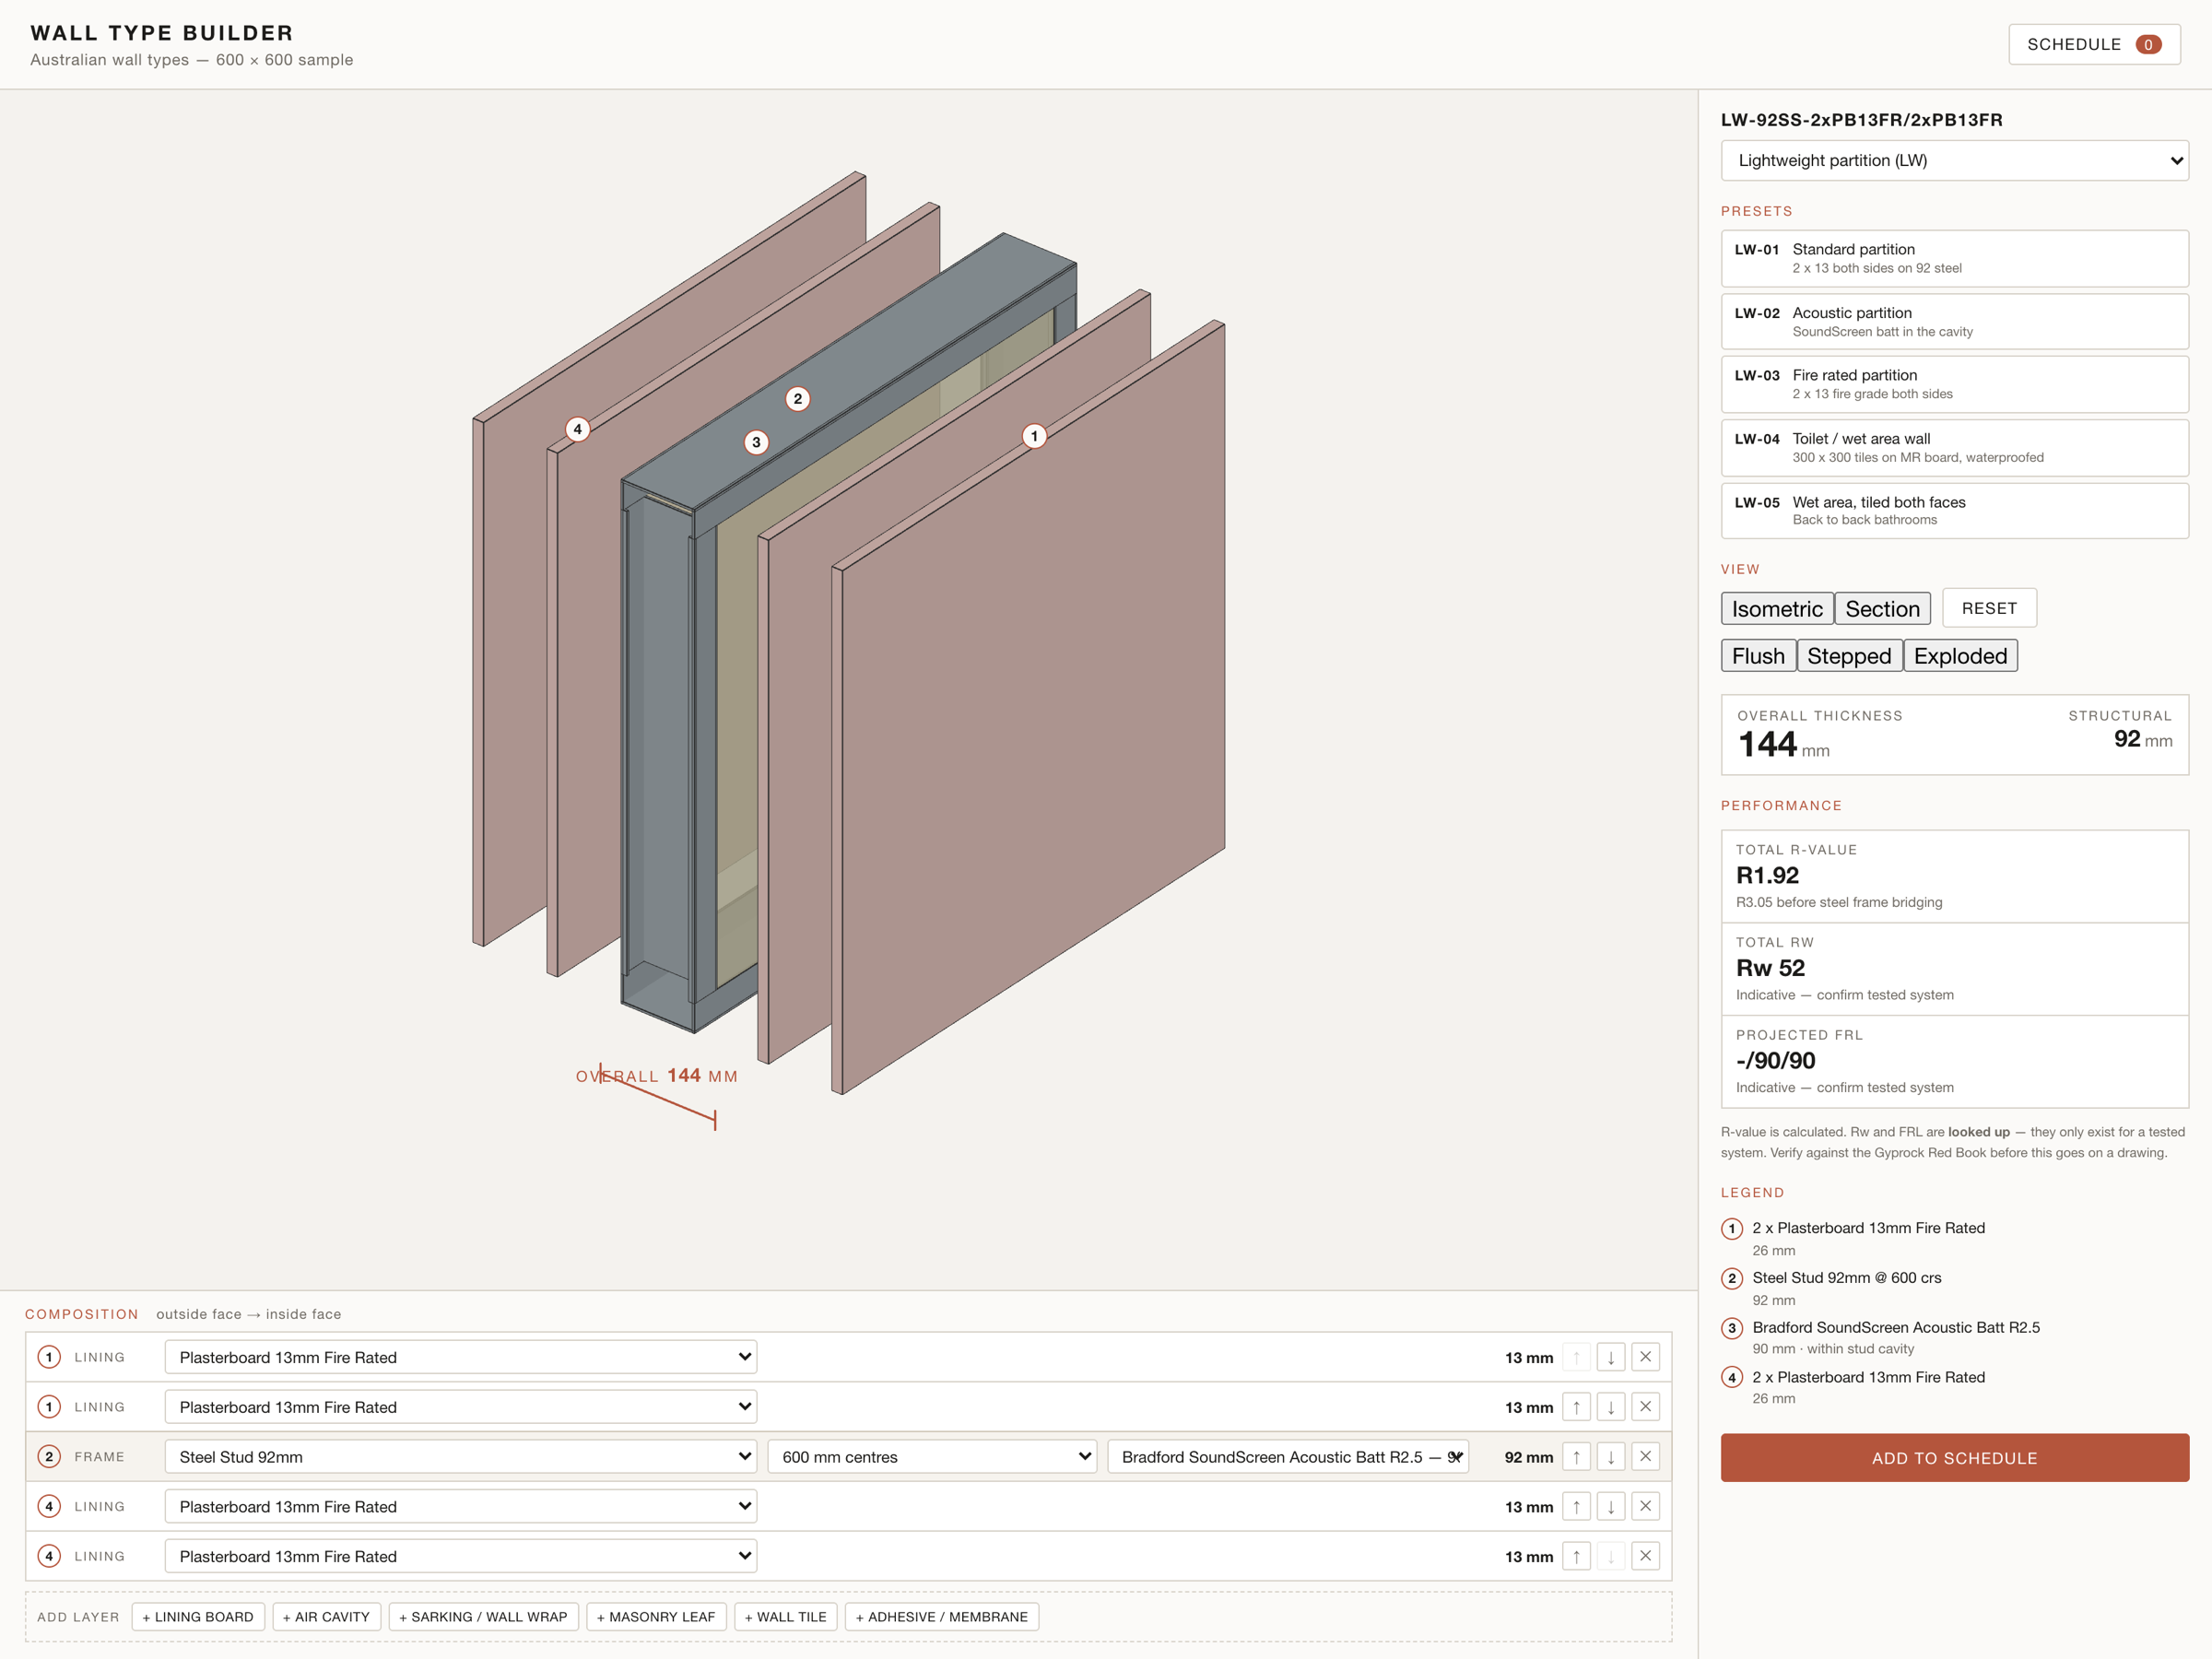
The one mistake: treating moisture resistant board as waterproofing. It is a substrate. The waterproof membrane is a separate layer, and in the tool it is a separate row, because on site it is a separate trade.
Check 03The cavity: the batt is sized to the frame
Like specifying a 90mm downpipe for a 65mm outlet. It does not matter how good the product is.
Insulation batts come in real thicknesses. Bradford Gold and SoundScreen sit at 50, 70, 75, 90 and 140mm, and each one is made to fill a particular frame.
A 90mm batt does not go into a 64mm steel stud. It gets crushed on site, loses most of its value, or simply does not get installed.
So the tool refuses. Pick a batt too thick for the frame and it says so in plain words, drops it out of the model, and takes it out of the R-value.
The other half of the same rule: the batt never adds to the wall thickness. It lives inside the studs. A 92mm wall with an R2.5 batt is still a 92mm wall.
Use it for: catching an impossible spec before it reaches a tender.
Here is my wall build-up: [list every layer, outside face first, with thicknesses].

Check it for physical impossibilities before you tell me anything else:
- is the insulation thicker than the frame it sits in
- does any layer depend on another that is missing
- is anything specified that does not come in that size

For each problem, tell me what will not fit and what the nearest real product is.

If the build-up is fine, say so plainly. Do not invent a product to make it work.
The one mistake: specifying the R-value you want rather than the batt that fits. Work the other way round: the frame sets the cavity, the cavity sets the batt, the batt sets the R.
Check 04Bridging: steel quietly eats your insulation
Like a thermal break on a window. Ignore it and the number on paper stops matching the wall.
This is the one I would put money on being wrong in most schedules in circulation.
A steel stud is a conductor running from one face of the wall to the other, every 600mm. Heat takes that path. The batt between the studs does much less work than its label suggests.
Timber bridges too, but far less.
So the tool shows both numbers. On the brick veneer wall in the picture at the top: R3.28 before frame bridging, R2.15 after. Same batt. Same wall. Over a full R apart.
Quote the first number and you are quoting the batt. Quote the second and you are quoting the wall.
Use it for: having a defensible number in front of the ESD consultant instead of a hopeful one.
On an external wall, the reflective sarking fixed to the stud face is doing more than weatherproofing. It turns the brick cavity into a reflective air space. In my calculation a bare ventilated cavity is worth about R0.14, and the same cavity faced with foil is worth about R0.40. One millimetre of material, nearly a third of an R.
The one mistake: writing the batt's R-value in the "wall R" column. They are different numbers and only one of them is the wall.
Check 05The rating: calculated, or looked up
Like the difference between a span you can calculate and a bushfire rating you cannot. One is arithmetic. One is a test certificate.
This is the most important idea in the whole tool, and it is not really about software.
Thermal performance is arithmetic. Surface films, each layer, the cavity, the bridging. Add it up and you have an R-value you can defend.
Acoustic and fire performance are not arithmetic. Rw and FRL are properties of a system that was physically built and tested. They do not emerge from adding layers together. They come out of a book.
So the tool splits the two. R-value it calculates. Rw and FRL it looks up, and where it has no matching tested system, it says TBC and tells you why.
| Figure | Where it comes from | What the tool does |
|---|---|---|
| R-value | Calculated from the build-up | Gives a number, bridged and unbridged |
| Rw | A tested system | Matched value, or an estimate marked with a tilde |
| FRL | A tested system, to AS 1530.4 | Matched value, a flagged pattern, or TBC |
One piece of reasoning in there is worth stealing even if you never touch the app. A wall has to resist fire from either side. So where the two faces differ, the lighter face governs. Two layers of fire grade board against one layer gives you the one layer rating, not the two.
Use it for: knowing which numbers on your schedule you can argue for, and which ones need a system number next to them.
You are helping me document wall types for [project].

Separate what you can calculate from what has to be looked up.

Calculate: thermal R-value, from surface films, each layer, the cavity and frame bridging. Show the bridged and unbridged figures separately and state your assumptions.

Do not calculate: Rw or FRL. Those are properties of a tested system. If I have not given you a tested system number, return TBC and tell me which document I need to look it up in.

Never produce a fire or acoustic rating that reads like a result when it is an estimate. Label every estimate as an estimate.
The one mistake: a plausible looking FRL on an issued drawing. A wrong R-value costs money. A wrong FRL is a different category of problem entirely.
Check 06The output: a schedule you can issue
Like the difference between a sketch and a drawing. One explains an idea. One goes in a set.
A 3D wall is a nice picture. It is not a deliverable.
The deliverable is the schedule: one column per wall type, laid out the way it reads on a sheet. An isometric with numbered tags. The composition, one numbered line per layer. Overall thickness. Structural thickness, which is the frame alone, because that is the number setting out uses. R, Rw, FRL. An empty field for the tested system number, and one for notes.
It exports as CSV in the same column orientation, so it drops into a schedule sheet without being transposed. Or it prints.
Types are numbered by family: LW-01 onwards for lightweight partitions, BW-01 onwards for brick veneer.
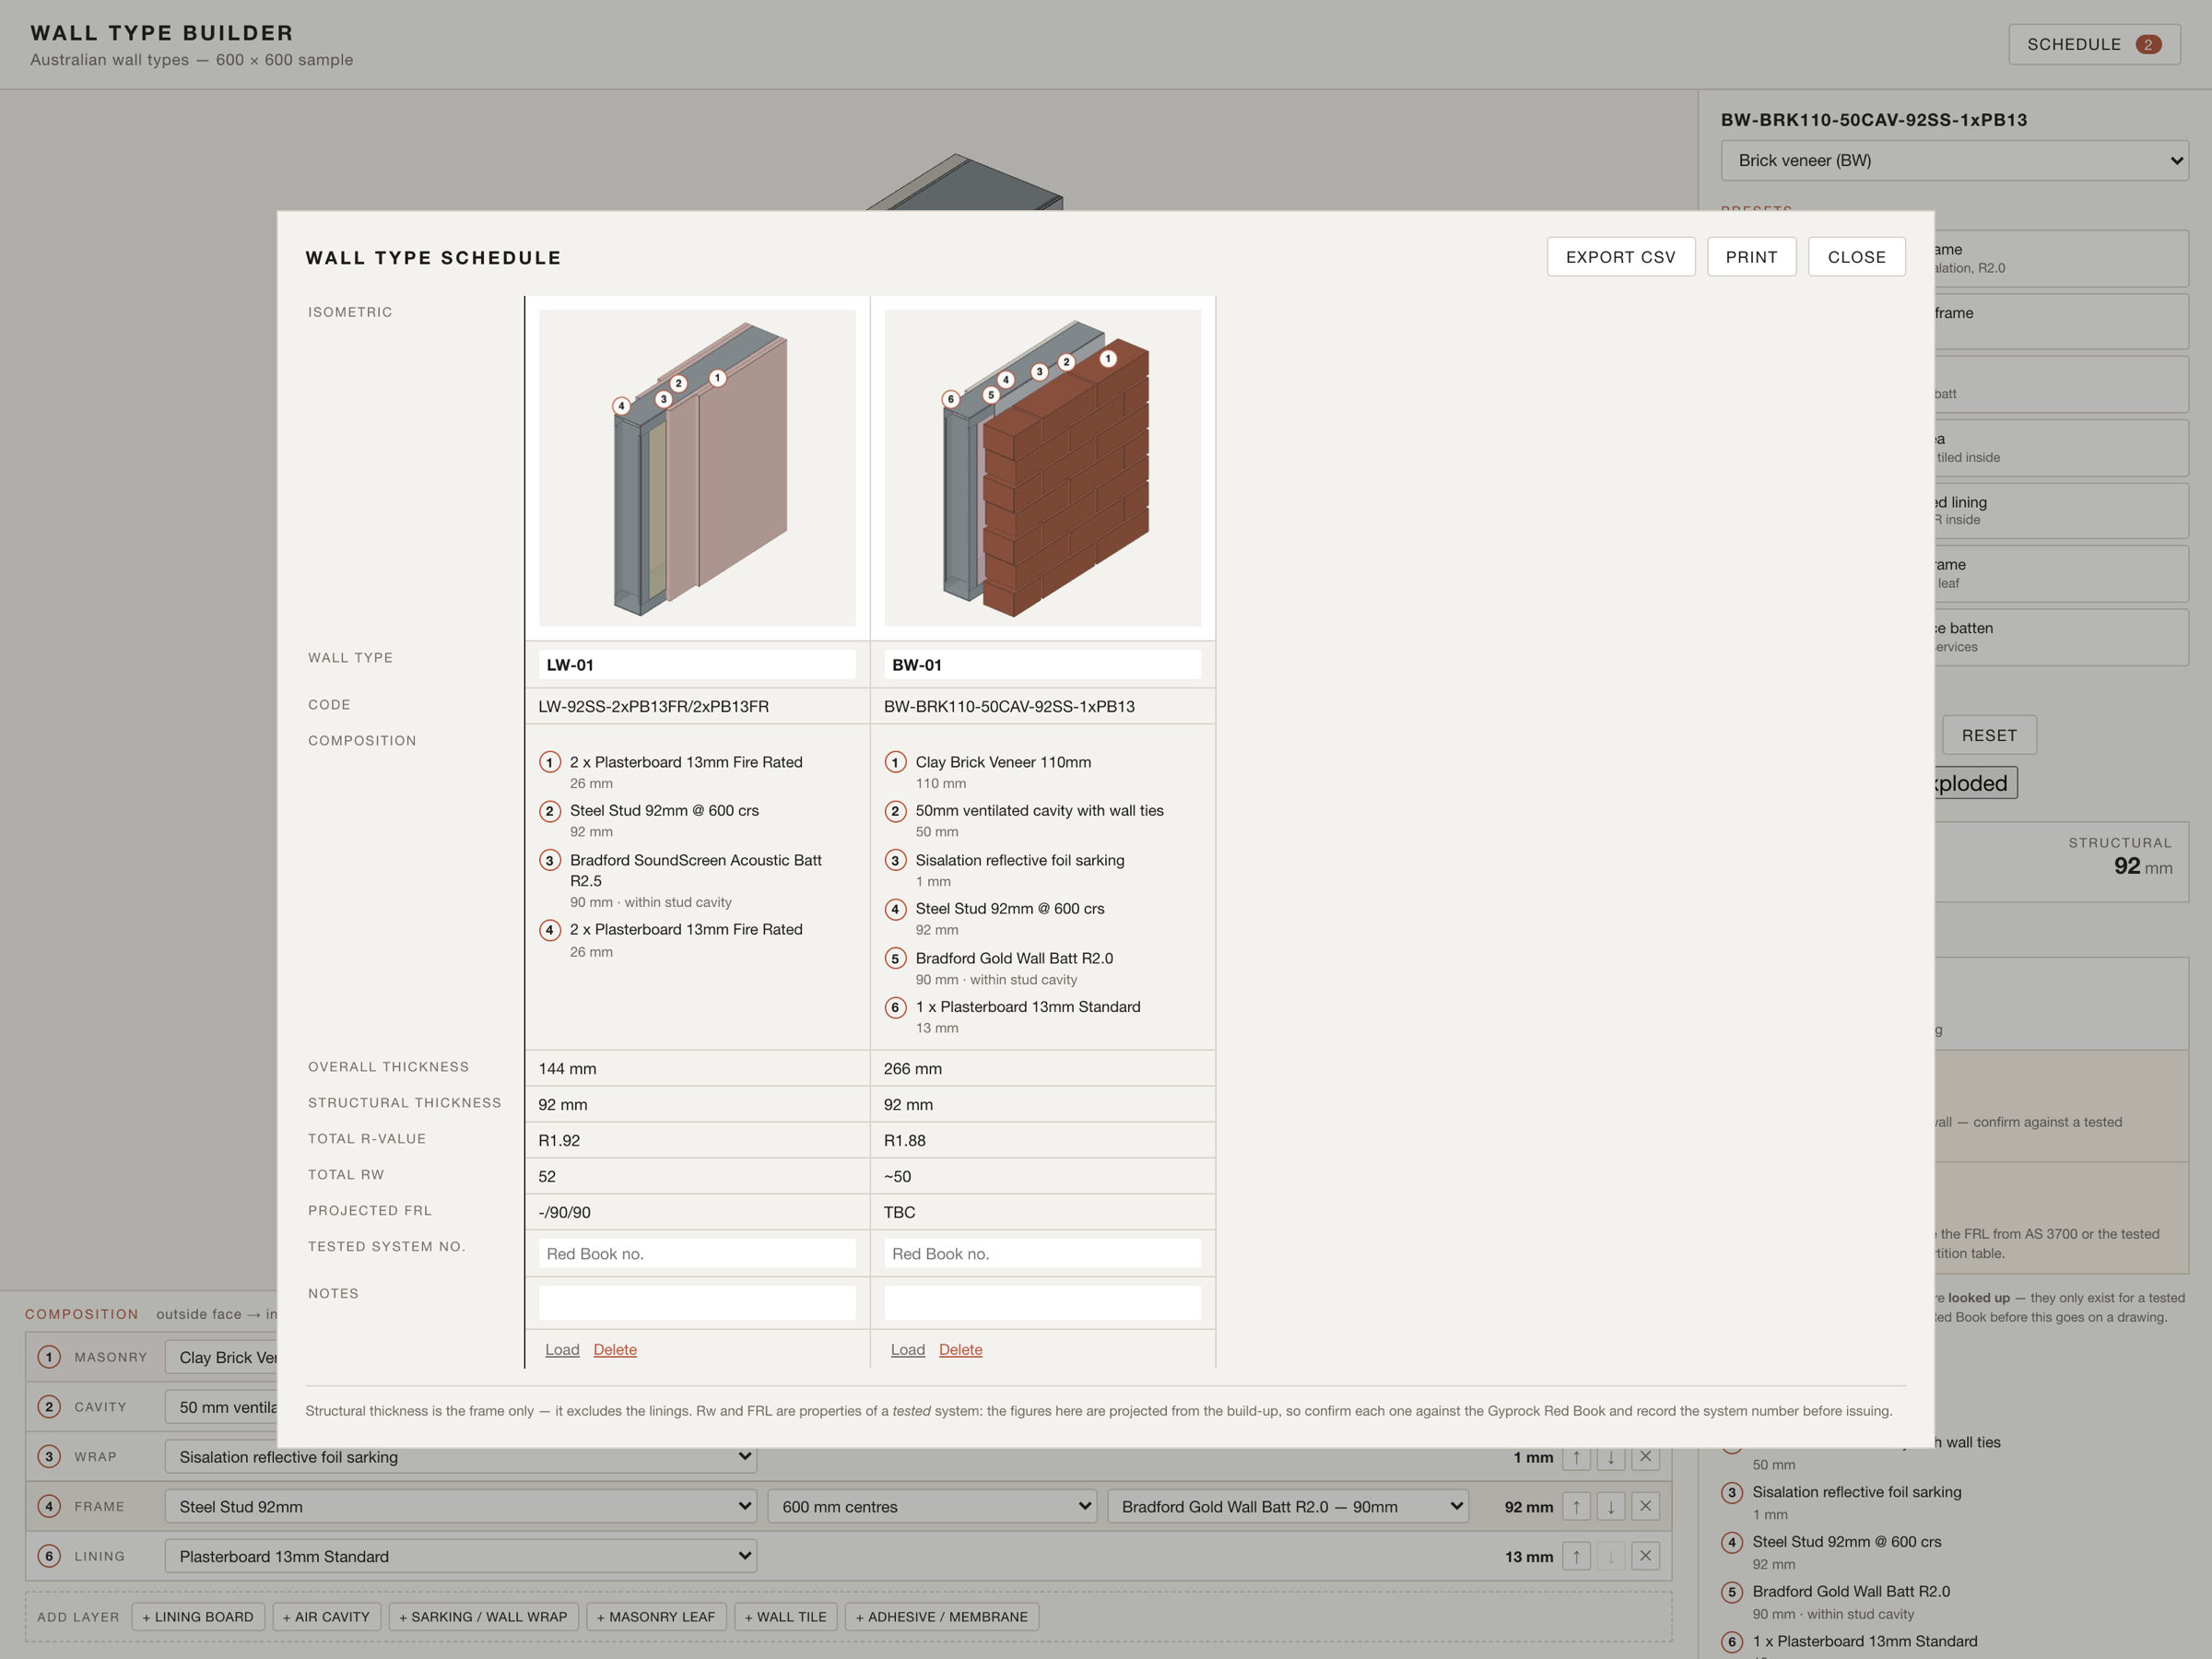
The one mistake: building the demo and stopping. The 3D view is the part that impresses people. The schedule is the part that saves you a day.
Build a wall type yourself →Check 07How it got built, in one session
Like briefing a graduate who types very fast and never gets bored.
I built this with Claude Opus 5, in Claude Code, in a single session. I did not write a line of it.
That sounds like the point. It is not.
The model wrote every line of code, and every line of code was easy. What made the tool correct was a list of things it had no way of knowing, that I had to tell it.
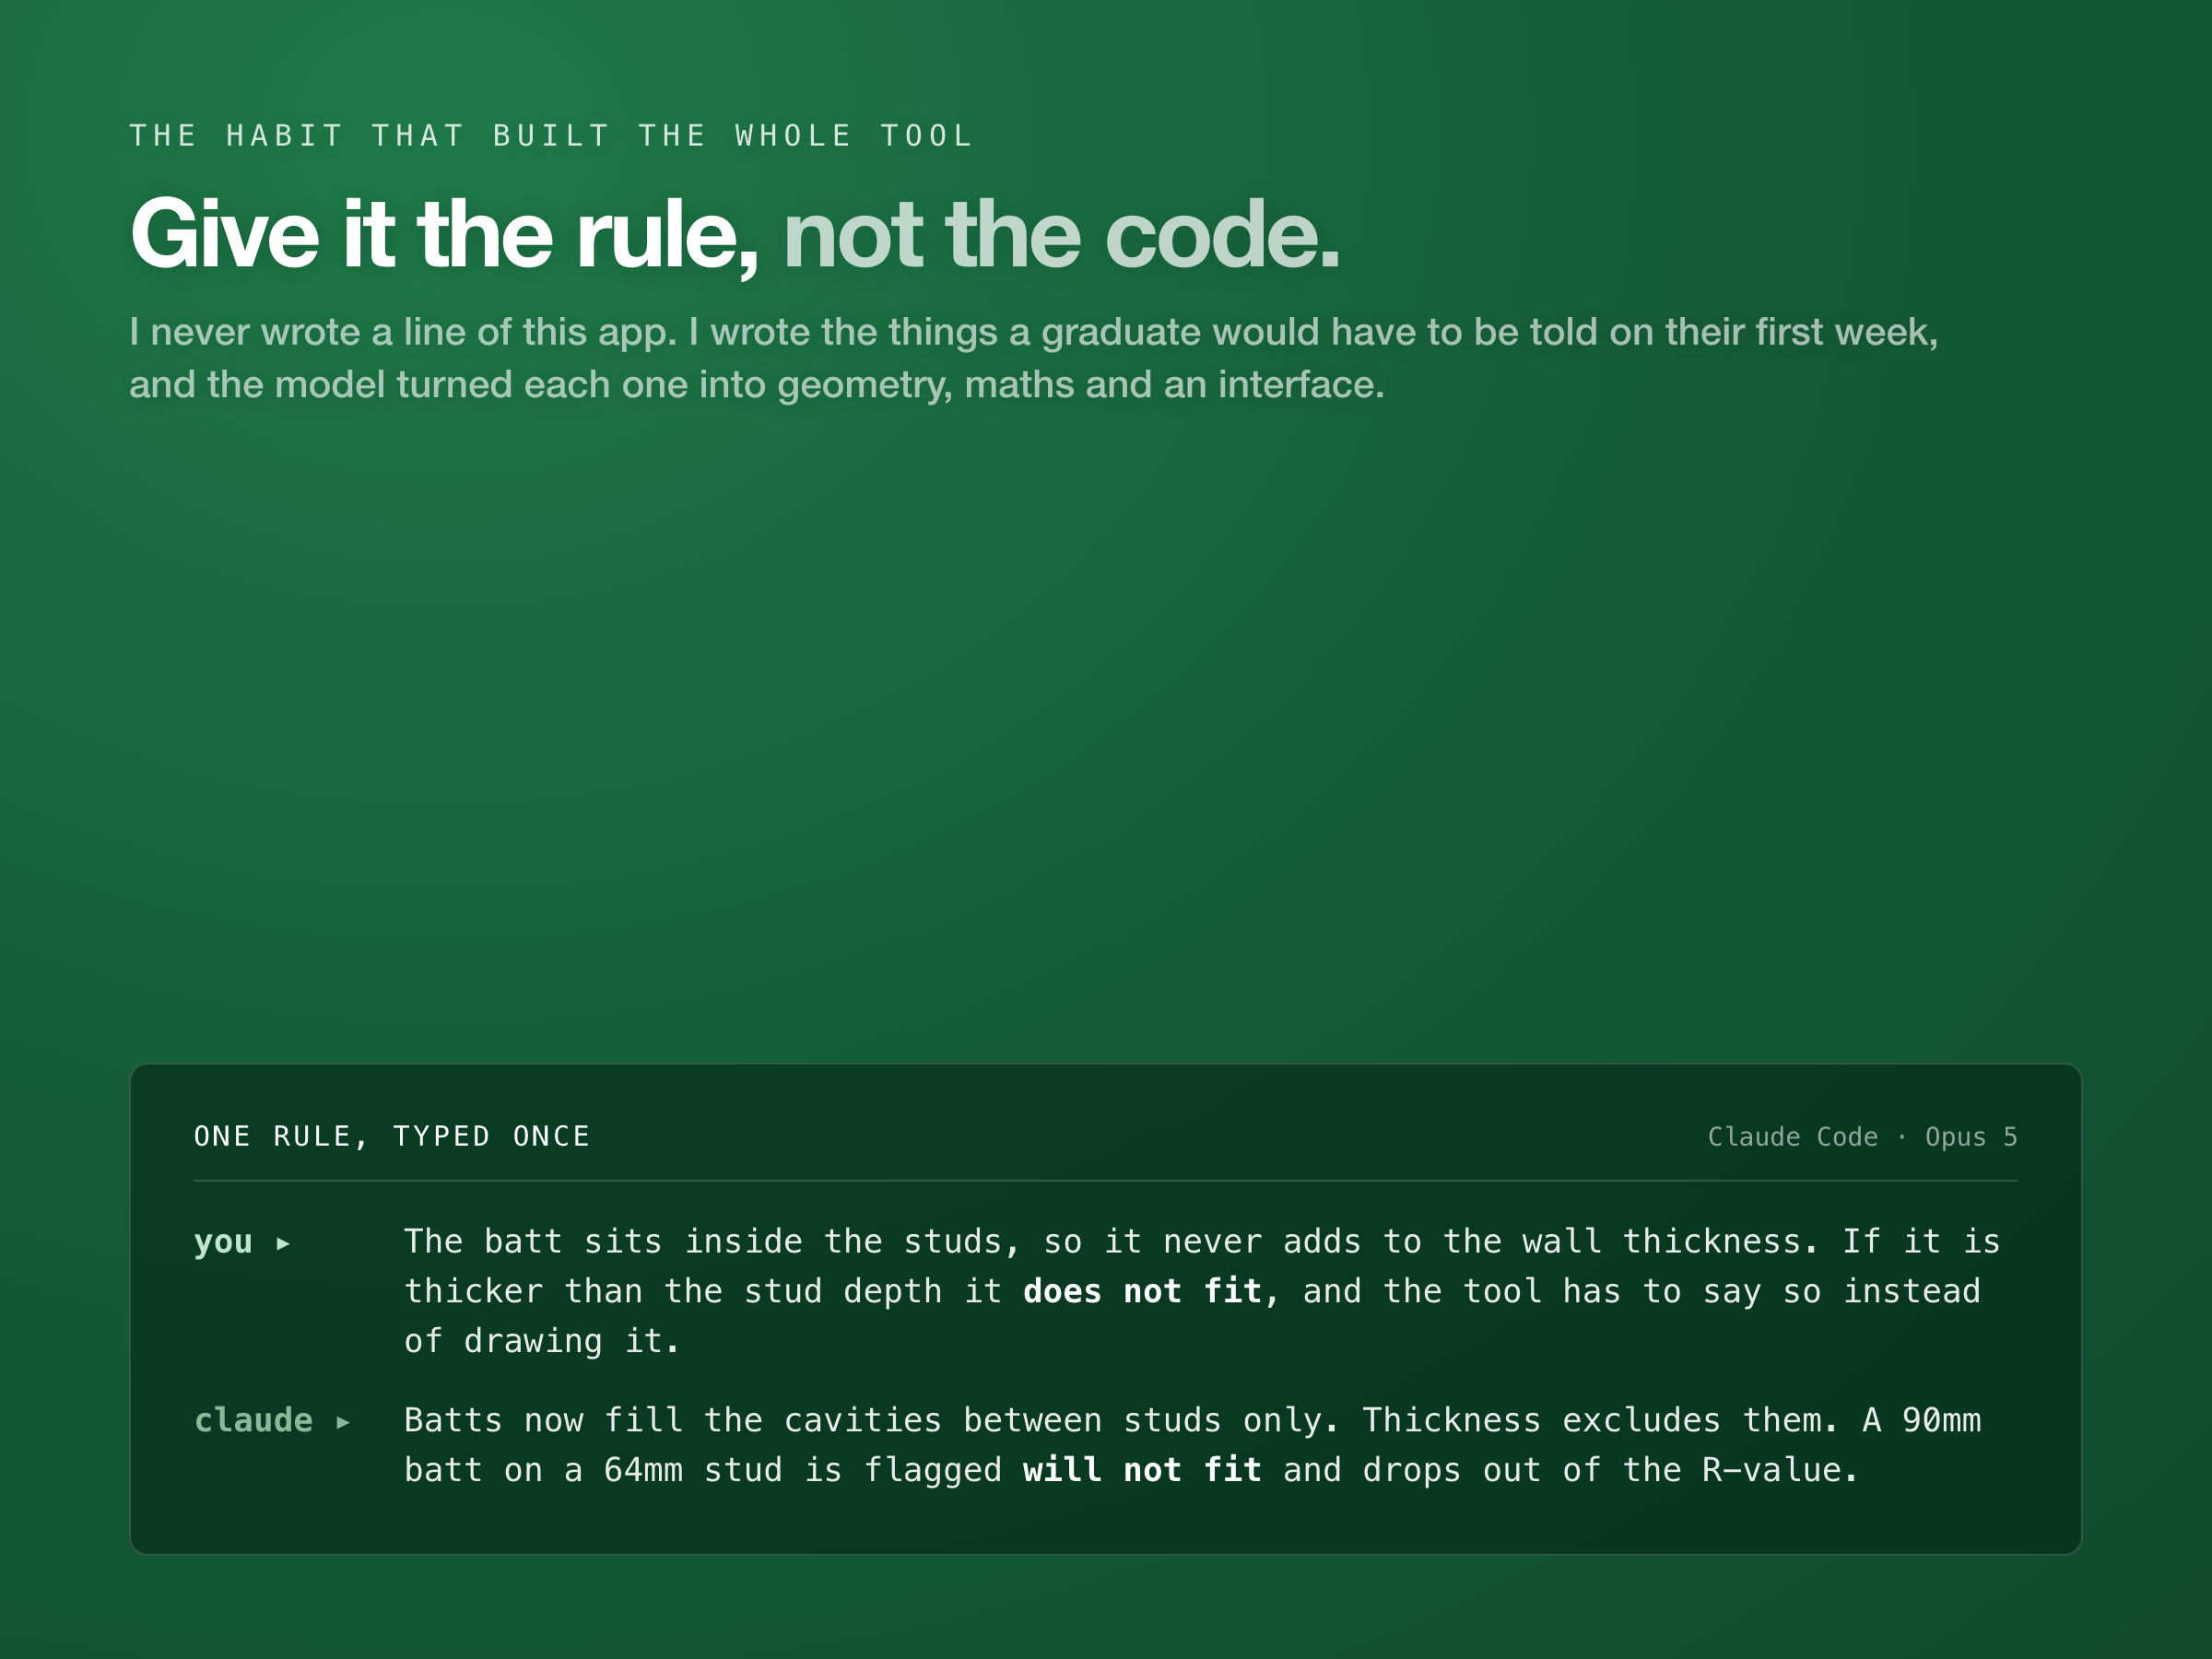
Things I had to say out loud, that no model starts with:
The batt sits in the cavity, so it never adds to the thickness.
Every external wall here has sisalation on the stud face.
50mm is the standard brick cavity.
Structural thickness means the frame, not the linings.
A wall resists fire from either side, so the lighter face governs.
None of those are code. All of them are the job.
The other half of the workflow is reviewing what you can already review. I cannot audit a page of React. I can look at a wall and see that the section is slanted, that the brickwork is staggering where it should run flush, that the tags are sitting on top of each other. Every one of those was a real bug, found by eye in a couple of seconds, described in a sentence, and fixed.
Vibe coding worked here for one reason: I was the person who could tell when the answer was wrong.
Start with something you already check by hand every week, so you can spot a wrong answer instantly. I did the same thing with a floor plan to LEGO builder before this one.
Claude Code is the surface that does it. If you have only ever used the chat window, the five surfaces is the map. And if you want the repeatable version rather than a one-off, that is what a Skill is.
The part AI can't do
Here is the honest limitation, and it is a real one.
The fire and acoustic values seeded into my tool are build-up patterns, not certified test results. Every one of them is flagged in the app as needing verification, with a blank field waiting for the real system number.
That is deliberate. The tool does not certify anything. It cannot.
It sums a thickness faster than I can. It will not tell you whether this wall is the right wall for this room in this building.
And the scarce thing in the whole exercise was never the code. It was knowing that a 90mm batt does not go in a 64mm stud.
The model built the tool in a session. It could not have told me a single rule that made the tool correct.
Build the thing once.
Comment "WALL" and I will send you the build: the layer model, the calculation rules, and the prompts above in one file.
And if someone in your office owns the wall type sheet, send this to them. They have been doing it by hand for years.