I built the brick wall tool BIM was missing. (here is every prompt)
7 prompts. From an empty page to a wall that pushes past its own face, checks whether a bricklayer could lay it, and exports straight into ArchiCAD and Revit.
A client asked for a feature wall. Something with more life than a plain running bond.
Fair request. Then I opened the model to design it, and stopped.
In ArchiCAD or Revit a brick wall is a composite. The brick is a surface finish, not a thousand separate parts. That is why BIM is fast, and it is exactly why BIM fights you the moment the design lives in the individual bricks.
So I built the part that was missing. A small browser app that treats the wall the way a bricklayer sees it, then hands the model back clean geometry and a clean brick count.
This is not a think-piece. Every stage below is a prompt you can copy, hand to your AI coding assistant, fill in the [bracketed bits], and build on today. I have left the coding tool out on purpose. Any capable one will do.
2 things before we start
- You do not need to be a developer. You need to read what comes back and test it, the same way you check a graduate's drawings.
- Build it in this order. Each prompt assumes the one before it is working. Get a wall standing before you make it dance.
A single-page web app. Three.js for the 3D, a light control panel down one side, a read-out down the other. No account, no server, it runs in a browser tab.
Prompt 01The empty app
Start with the room, not the furniture. One scene you can orbit, lit so brick reads, with a person in it for scale.
Get this working and boring first. A grey box on a floor. If you can spin it and it does not stutter, the hard part is downhill.
Set up a single-page web app in TypeScript using Three.js.

Layout: three columns. Left = a scrollable control panel.
Centre = a full-height 3D canvas. Right = a read-only results panel.
Dark UI, quiet and technical, like a piece of engineering software.

In the canvas:
- a perspective camera with orbit controls (rotate, pan, zoom),
- a soft studio light set-up so a matte surface reads its form
  (one key light, gentle fill, a large area light overhead),
- a neutral ground plane that catches a soft contact shadow,
- a 1.8 m human figure standing on the ground for scale.

Put one placeholder box (2.4 m x 1.0 m x 0.2 m) in the centre so I
can confirm the camera, lighting, shadow and scale figure all work.

Keep the code in clear modules: scene set-up, the model, the UI.
I will replace the box with a real brick wall next.
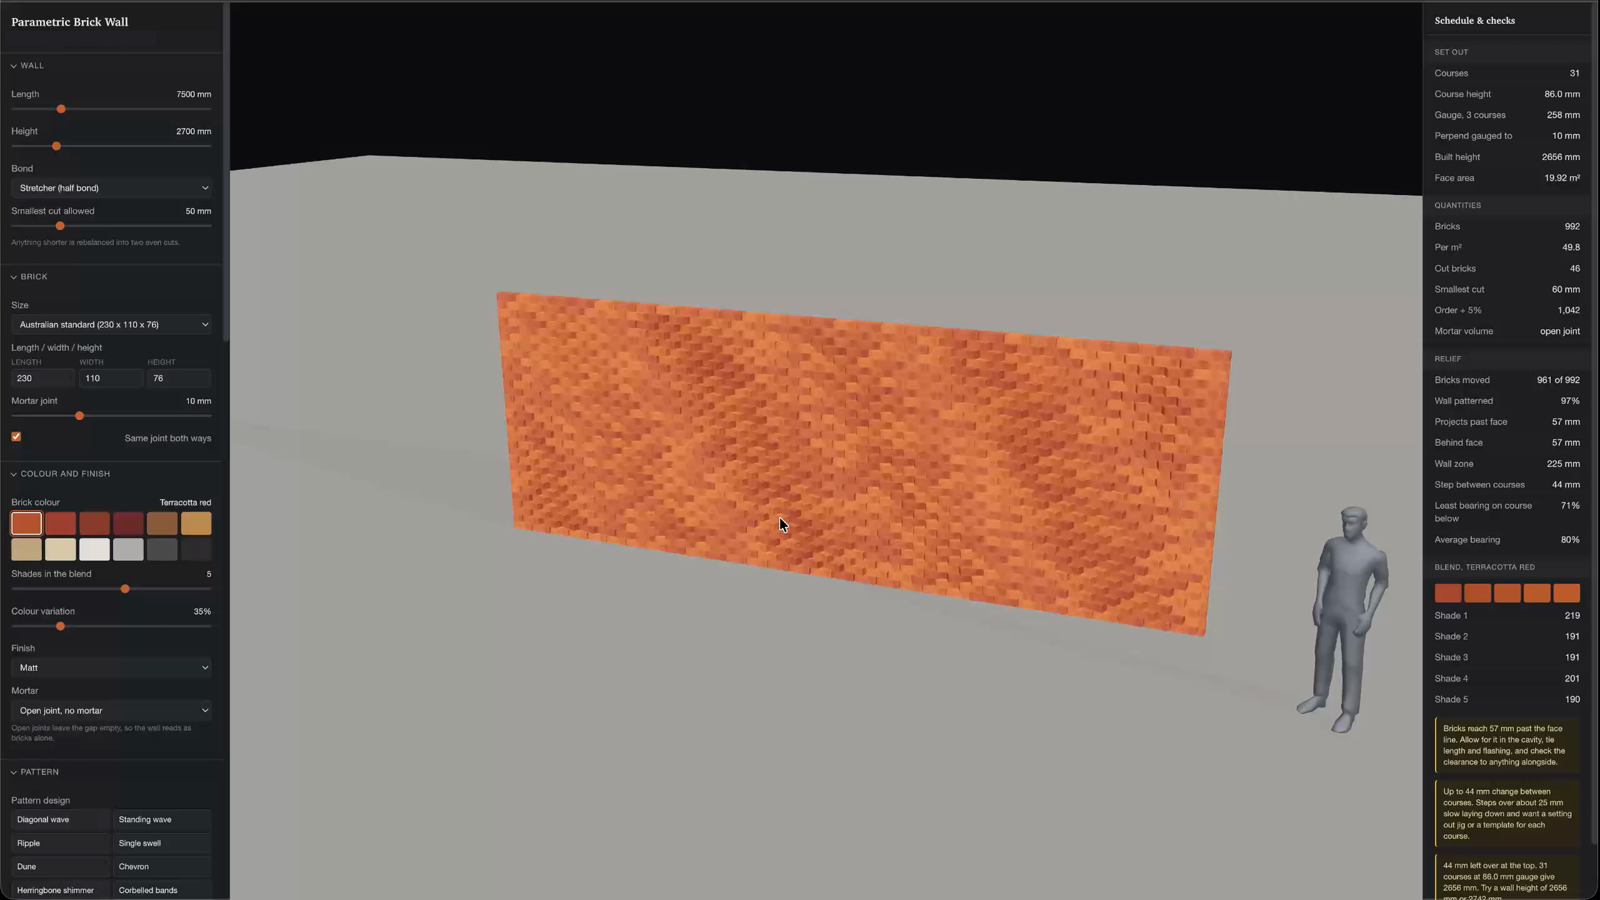
Watch for: the scale figure is not decoration. Half the judgement in this whole tool is "how big does that actually read," and you cannot tell without a person standing next to it.
Prompt 02A wall a bricklayer would recognise
This is the foundation the whole tool stands on. Not a textured slab. Real bricks, in courses, laid to a bond, with a mortar joint and honest end cuts.
The trick that makes everything later possible: hold the wall as a flat list of bricks, each one just a position and a size. The 3D view, the pattern, the colours and every export all read from that one list.
Replace the placeholder box with a real brick wall, built brick
by brick.

Inputs (as sliders / fields in the left panel):
- wall length and height (mm),
- brick size (default Australian standard 230 x 110 x 76 mm),
- mortar joint thickness (default 10 mm),
- bond (start with stretcher / half bond),
- smallest cut allowed (mm): any end cut shorter than this is
  rebalanced into two even cuts instead of one runt.

Build it as data first, geometry second:
1. Course height = brick height + joint. Number of courses =
   floor(wall height / course height).
2. Per course, lay bricks along the length with a perpend joint
   between them, offsetting alternate courses by half a brick for
   the bond. Cut the end bricks to fit and apply the smallest-cut
   rule.
3. Store the result as a flat array of bricks: for each, its row,
   column, position (x, y, z), length, and whether it is a cut.
4. Render every brick from that array with an InstancedMesh so a
   thousand bricks stay smooth.

The array is the single source of truth. Everything else reads it.
What you get: a plain, correct brick wall you can already set out. Change the length and the courses and cuts redo themselves.
Watch for: the smallest-cut rule matters more than it looks. Without it you get a 15 mm slither at the end of every course, which no bricklayer will cut and no wall should show.
Prompt 03The field that moves every brick
Here is the idea the whole tool turns on.
You do not move the thousandth brick. You describe a field, an invisible wave across the wall, and every brick reads its own spot on it. Where the crest passes, bricks lean out and catch the light. In the troughs they sit flat.
Set the rule once. Every brick follows it. Slide one control and the whole face reorganises, live.
Add a "movement" system that pushes and rotates each brick based on
its position, so the flat wall becomes a 3D relief.

For each brick, sample a scalar field value between 0 and 1 from its
centre point (x, y) on the wall face. Start with a directional wave:
  value = 0.5 + 0.5 * sin( 2*pi * frequency * (x*cos(a) + y*sin(a))
                            / wavelength + phase )
where "a" is the field angle.

Map that value to the brick, along the wall's normal:
- projection: value drives how far the brick pushes past the face
  (a depth in mm you set with a slider),
- rotation: value also tilts the brick slightly about its vertical
  axis, so it turns as it projects.

Add controls: projection depth, rotation amount, frequency, field
angle, phase, centre-across and centre-up (where the field is
strongest), and "fade to flat at edges" so the wall settles back to
flush at its borders. Add invert, and a random-depth jitter with a
seed so a given seed always rebuilds the same wall.

Update the InstancedMesh matrices per brick, live, as I drag.
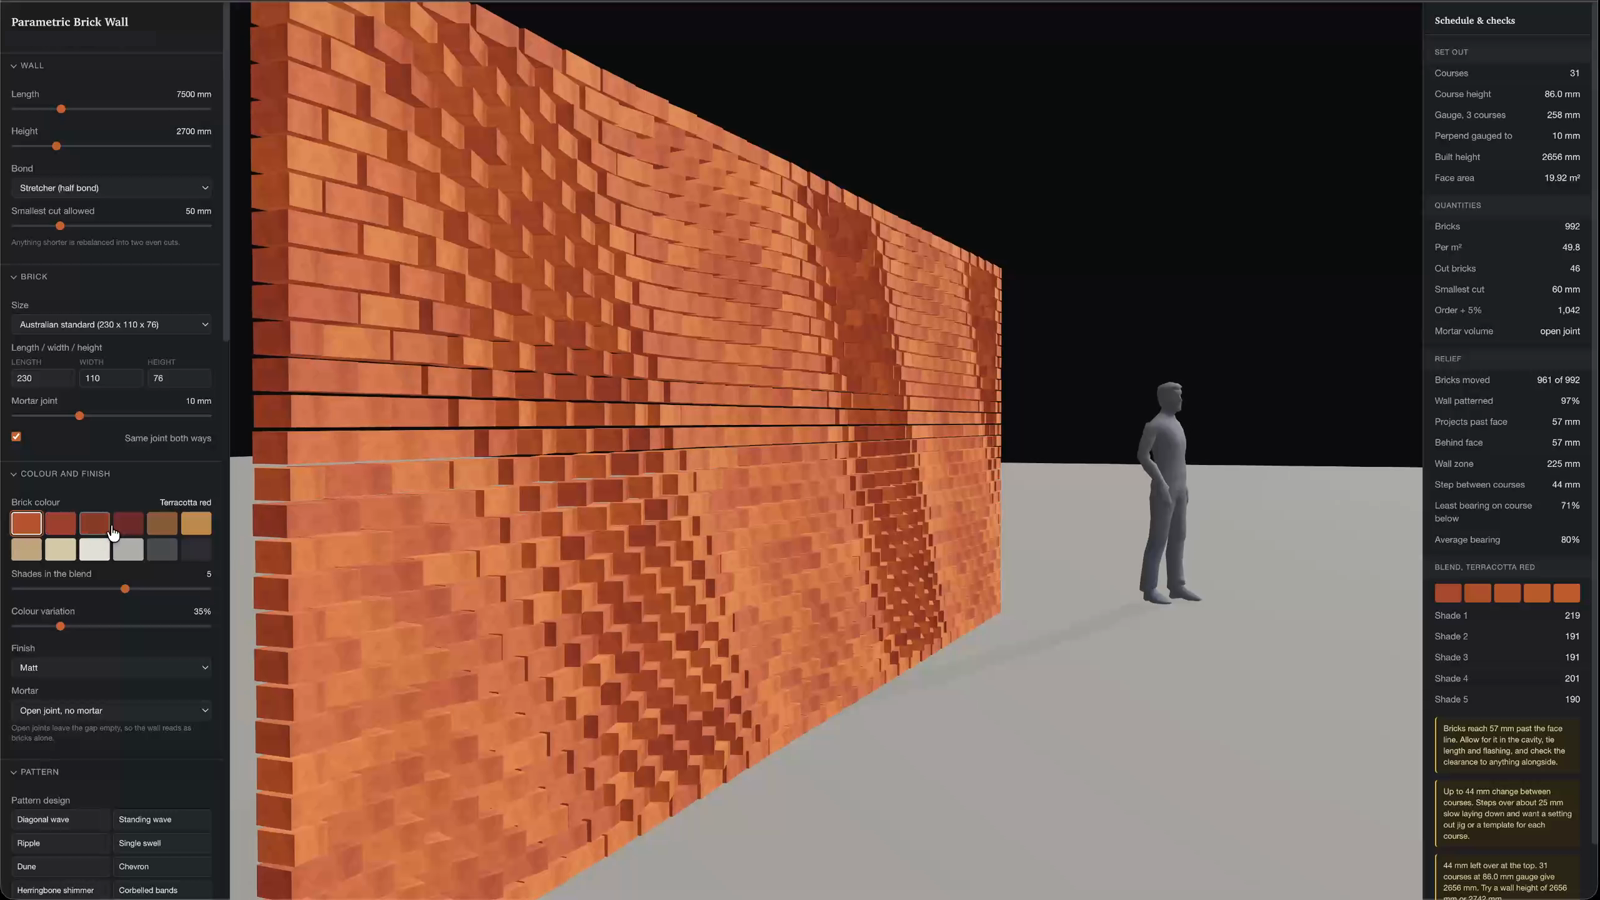
Watch for: keep the field separate from the bricks. The bricks do not know what shape they are making. They just ask the field "how far, how much turn" at their spot. That one separation is what lets the next prompt give you fifteen patterns for free.
Prompt 0415 patterns from one engine
Because the bricks only read a field, a new pattern is just a new field. Swap the maths behind the wave and the whole wall answers differently. No new plumbing.
Give them names an architect would use, not equations. Diagonal wave. Ripple. Dune. Chevron. Herringbone shimmer. Corbelled bands. A single swell that pushes out of the middle.
Turn the single wave into a library of field types, each a small
function that returns a 0-1 value for a point on the wall:

- directional wave (what we have),
- standing wave and ripple (radial, from a centre point),
- single swell (one broad bulge),
- dune (stacked offset waves),
- chevron and diagonal wave (angled bands),
- herringbone shimmer and basket (bond-based offsets),
- corbelled bands (stepped horizontal bands),
- diamond, moire lens, scattered (seeded random), every third
  course, and flat brickwork as the neutral default.

Present them as named presets in the panel. Selecting a preset sets
the field type and sensible defaults for projection, rotation,
frequency and fade, then leaves every one of those controls live so
I can keep tuning by hand. A preset is a starting point, not a lock.
What you get: 15 genuinely different walls, each still fully adjustable, all from one engine you only had to build once.
Prompt 05Real brick, mixed live
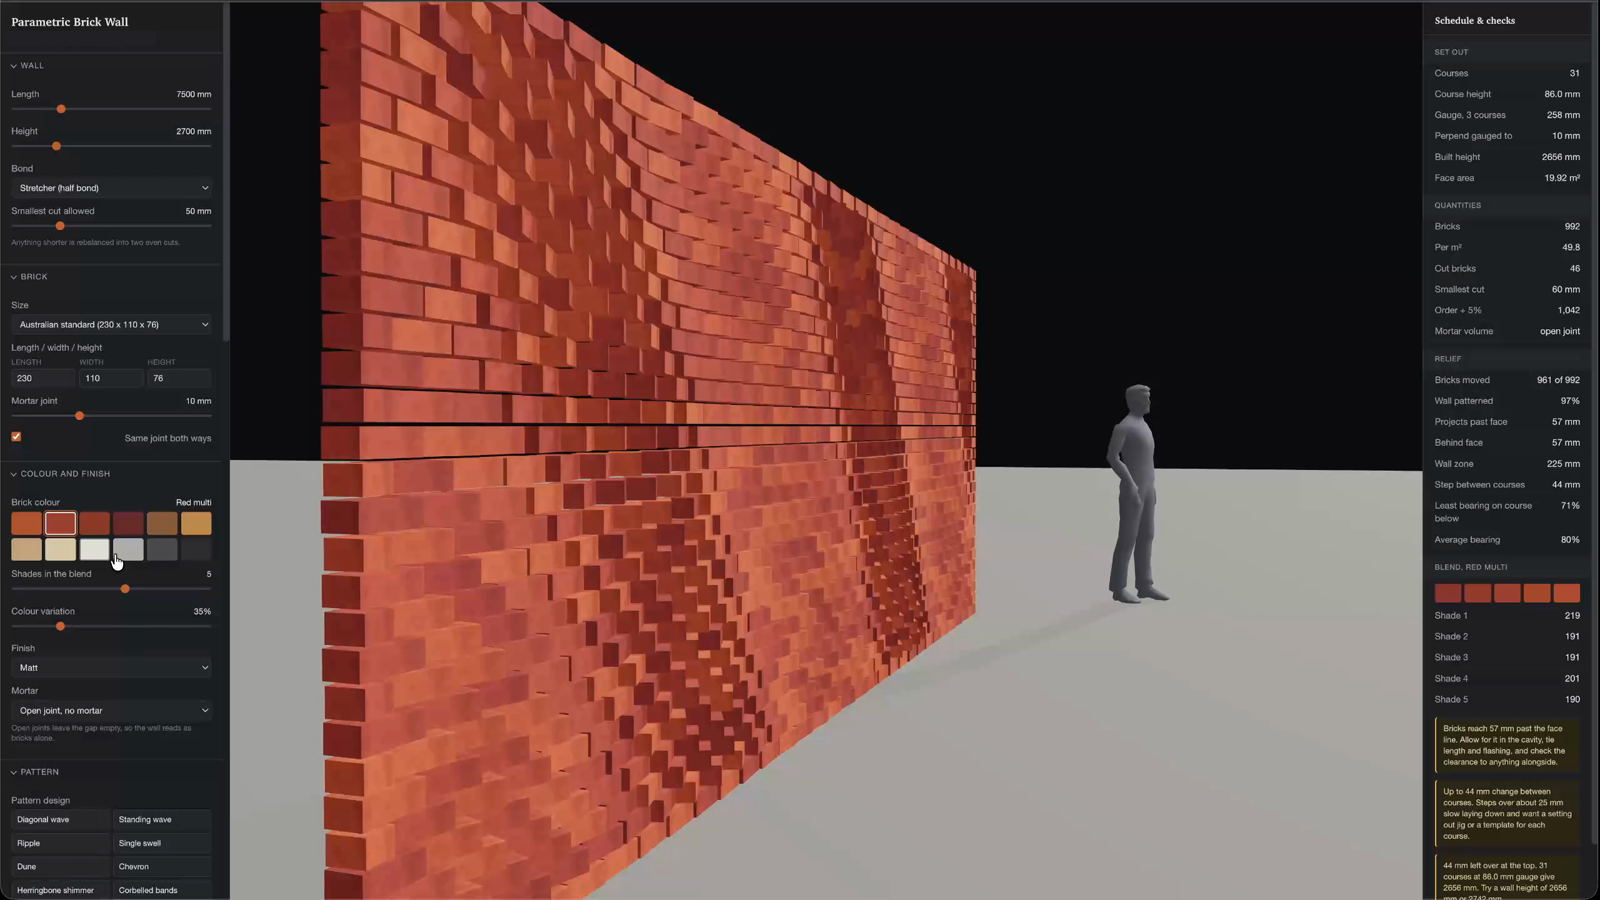
A single flat colour kills it. Real brick is a blend of shades, and the blend is where a wall stops looking like a render.
Add colour and finish.

- A palette of real brick colours (terracotta, reds, browns, a
  cream range, greys, charcoal) as swatches.
- "Shades in the blend": mix 1 to 5 shades of the chosen colour.
- "Colour variation": how far each brick strays from its shade.
- A finish control (matt / satin) affecting the surface only.
- A seed so the blend is repeatable.

Assign each brick a shade using the seed, and set it as a per-
instance colour on the InstancedMesh so a thousand bricks recolour
instantly. Show the blend on the right: how many bricks of each
shade. That count is what you take to the brick supplier.
Prompt 06Can it actually be built
This is the prompt that turns a toy into a tool.
A pretty pattern that cannot be laid is a picture, not a wall. So the app carries a bricklayer's checks live, down the side, while you design. And the most important number is the one I forgot in the first version.
The first build had no bearing check. Every pattern looked buildable, because a screen has no gravity. A deep twist that keeps barely a third of the brick on the course below looks fantastic and cannot be laid. I only caught it when I pictured handing the drawing to a bricklayer and imagined his face. The number went in, and half my favourite patterns failed it on the spot. That was the tool earning its keep.
Add a live "schedule and checks" panel on the right that recomputes
from the brick array every time anything changes.

Set-out and quantities:
- courses, course height, gauge (per 3 courses), built height,
  face area,
- total bricks, bricks per m2, cut bricks, smallest cut,
- order quantity with +5% wastage,
- count of each colour shade in the blend.

Buildability checks (this is the important half):
- how far the most-projected brick reaches past the face line,
- how far any brick sits behind the face,
- total wall zone depth (front-most to back-most),
- max step between adjacent courses,
- BEARING: for each brick, the plan overlap it keeps on the course
  below after it moves and rotates. Report the least bearing and
  the average bearing as a percentage of the brick.

Then warn in plain words when a number crosses a sensible limit:
low bearing, deep projection needing ties or support, steps too
big to lay cleanly. Warnings, not blocks. Tell me, do not stop me.
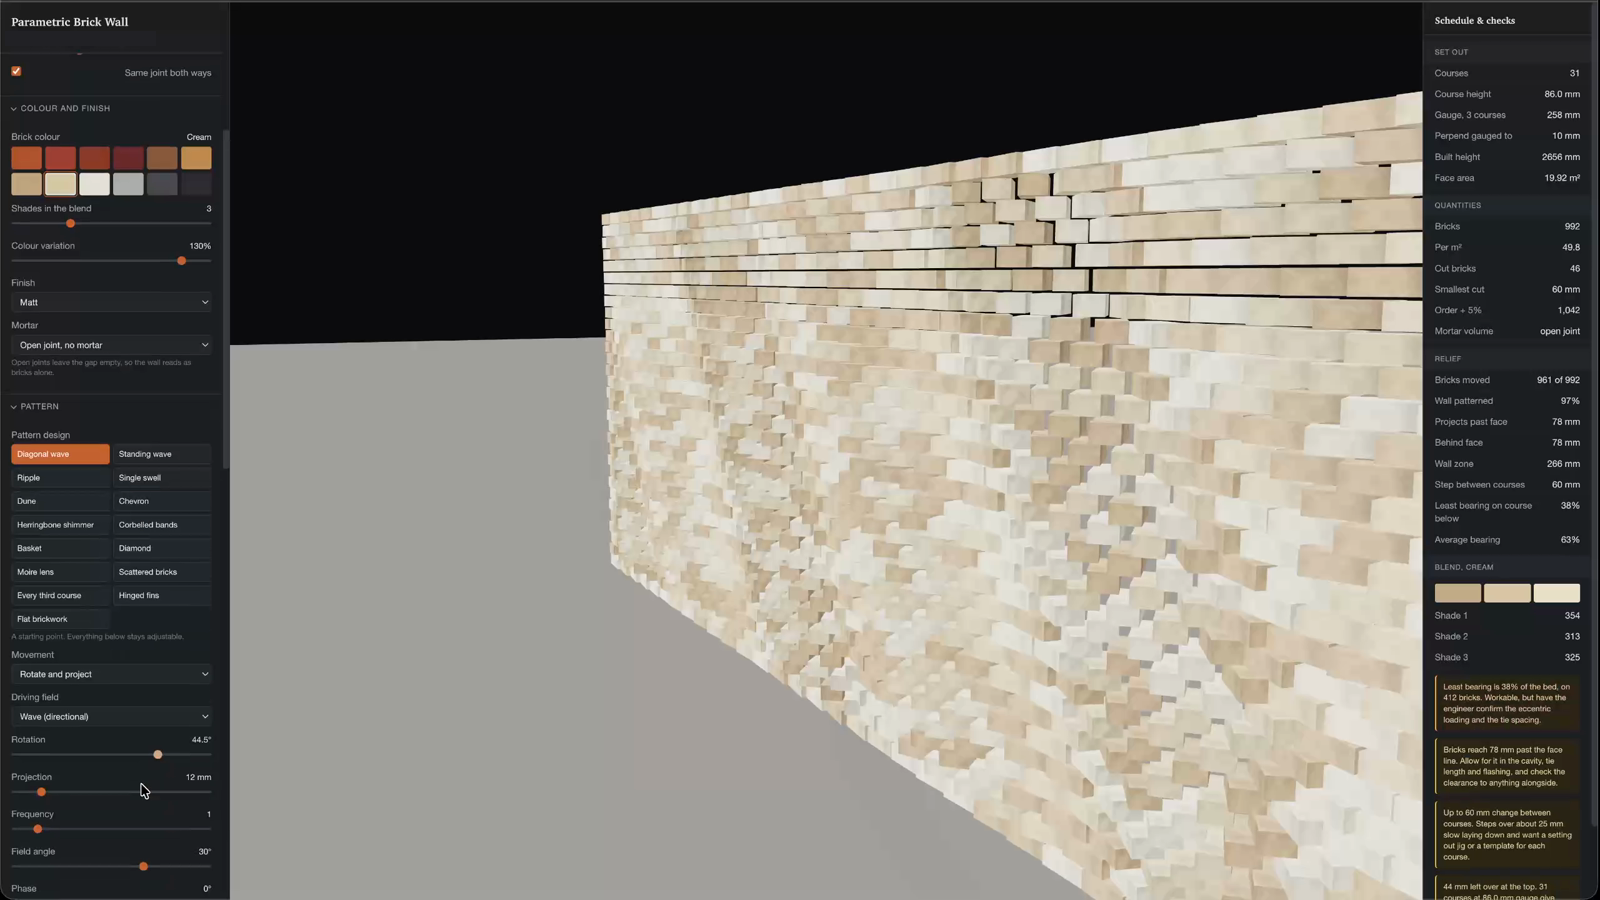
Watch for: make bearing a real geometric overlap, not a guess from the projection. A brick can project a long way and still bear well if it stays square, and barely project yet lose its bed if you twist it hard. The overlap is the truth. It is the one number that tells you no.
Prompt 07Straight into ArchiCAD and Revit
This is the whole point. The app does not replace your BIM model. It hands work back to it.
You design the wall here, where a wall of a thousand parts is easy, then export it and drop it into the model you already run. The model stays the single source of truth. The wall gets its feature back.
Add an export panel. Bake the brick array into real geometry and
write it out. Include settings for units, up-axis, and whether to
group by colour shade (one object per shade) and include the scale
figure.

Formats:
- IFC: the neutral BIM format both ArchiCAD and Revit read. Write
  the bricks as a tessellated solid inside an IfcBuildingElementProxy
  so it lands as placeable geometry in either.
- GDL: a native ArchiCAD object script that redraws the bricks.
- FBX, OBJ + MTL, Collada DAE: for visualisation tools.
- STL: for anyone who wants to print or mill it.
- DXF (3D faces): straight into documentation.

For the mesh formats use Three.js's own exporters where they exist.
For IFC, GDL and DXF, write the file as text yourself from the brick
array. Every export must carry the colour-shade grouping so the
model can tag the blend.
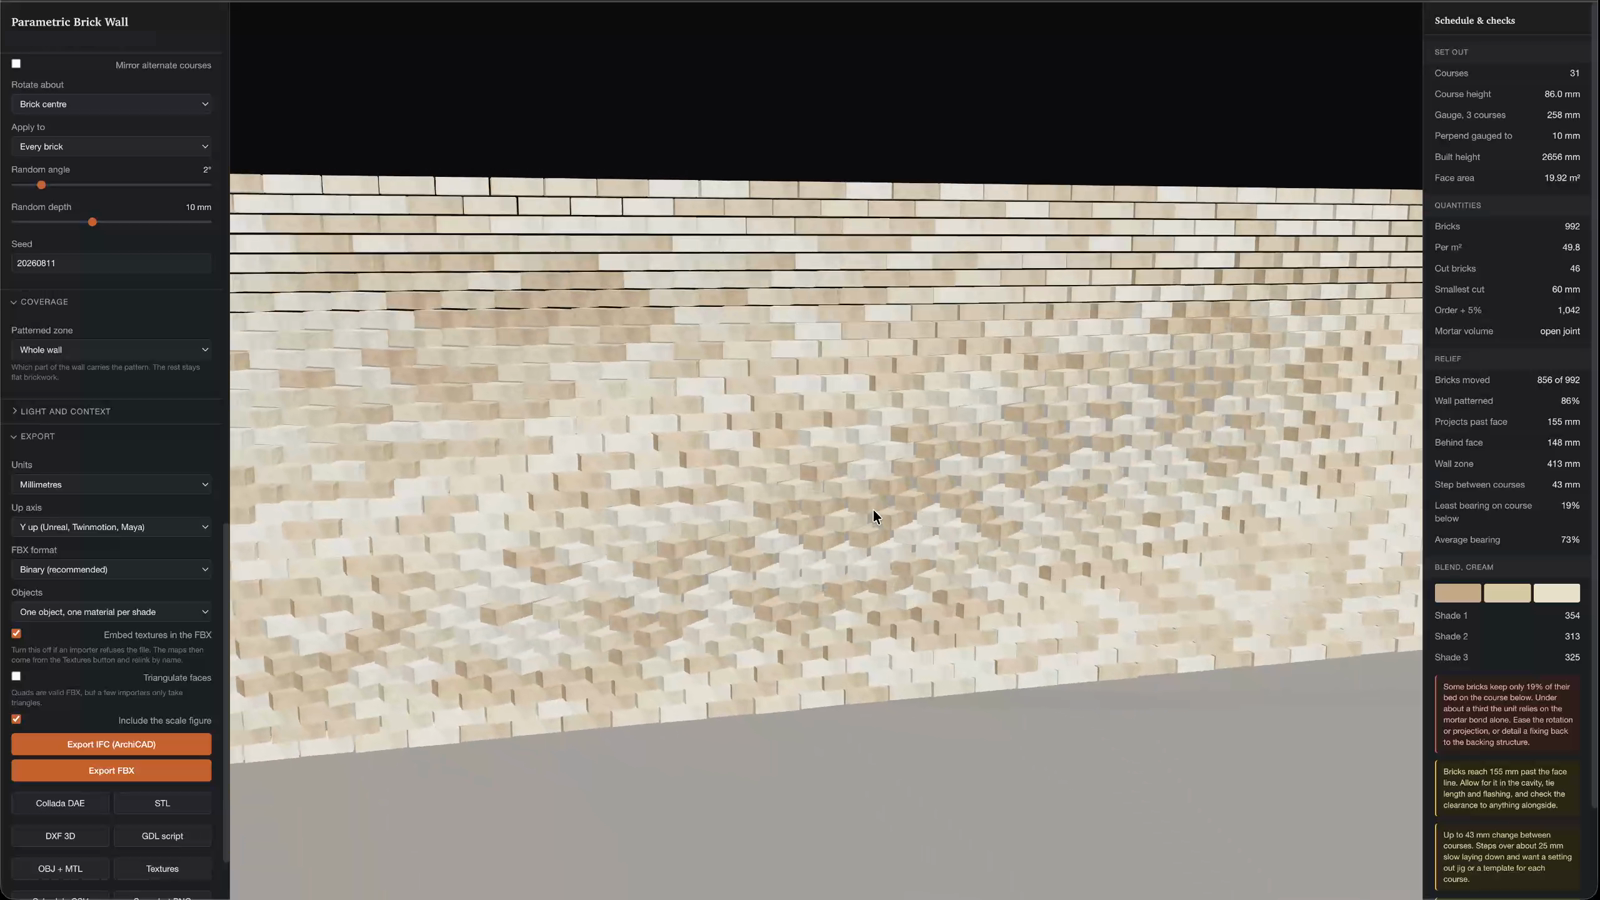
Be honest about it: the export is geometry and numbers, not a rated wall object. In the model it reads as a component, not a wall carrying fire and acoustic data. You place it against a real wall type. You do not bin the wall type.
The part that transfers
The tool is a brick wall. The method is bigger than brick.
BIM is brilliant at the wall as a system and clumsy at the wall as a thousand parts. Any time the design lives in the parts, the model fights you.
A shingled facade. A perforated screen. Random ashlar stone. A baffle ceiling. Same problem every time, and the same 7-step shape solves it. Hold the parts as a list. Drive them from a field. Keep the checks that make them buildable. Then hand the model clean geometry and clean numbers.
BIM did not need replacing. It needed a tool for the one job it was never meant to do.
This is what the workshops teach.
I run AI and computational design workshops for practices. This is the kind of tool we build in them, from a real problem in your office.
If a wall of a thousand parts is fighting your model right now, that is the place to start.