I turned a street model into a playable game. No game engine, no plugin, no licence.
The model you already have is a game level. Here is the whole pipeline: where the geometry comes from, what Opus 5 actually writes, free rigged characters, and 46 free sound effects. Every prompt free to copy, no email wall.
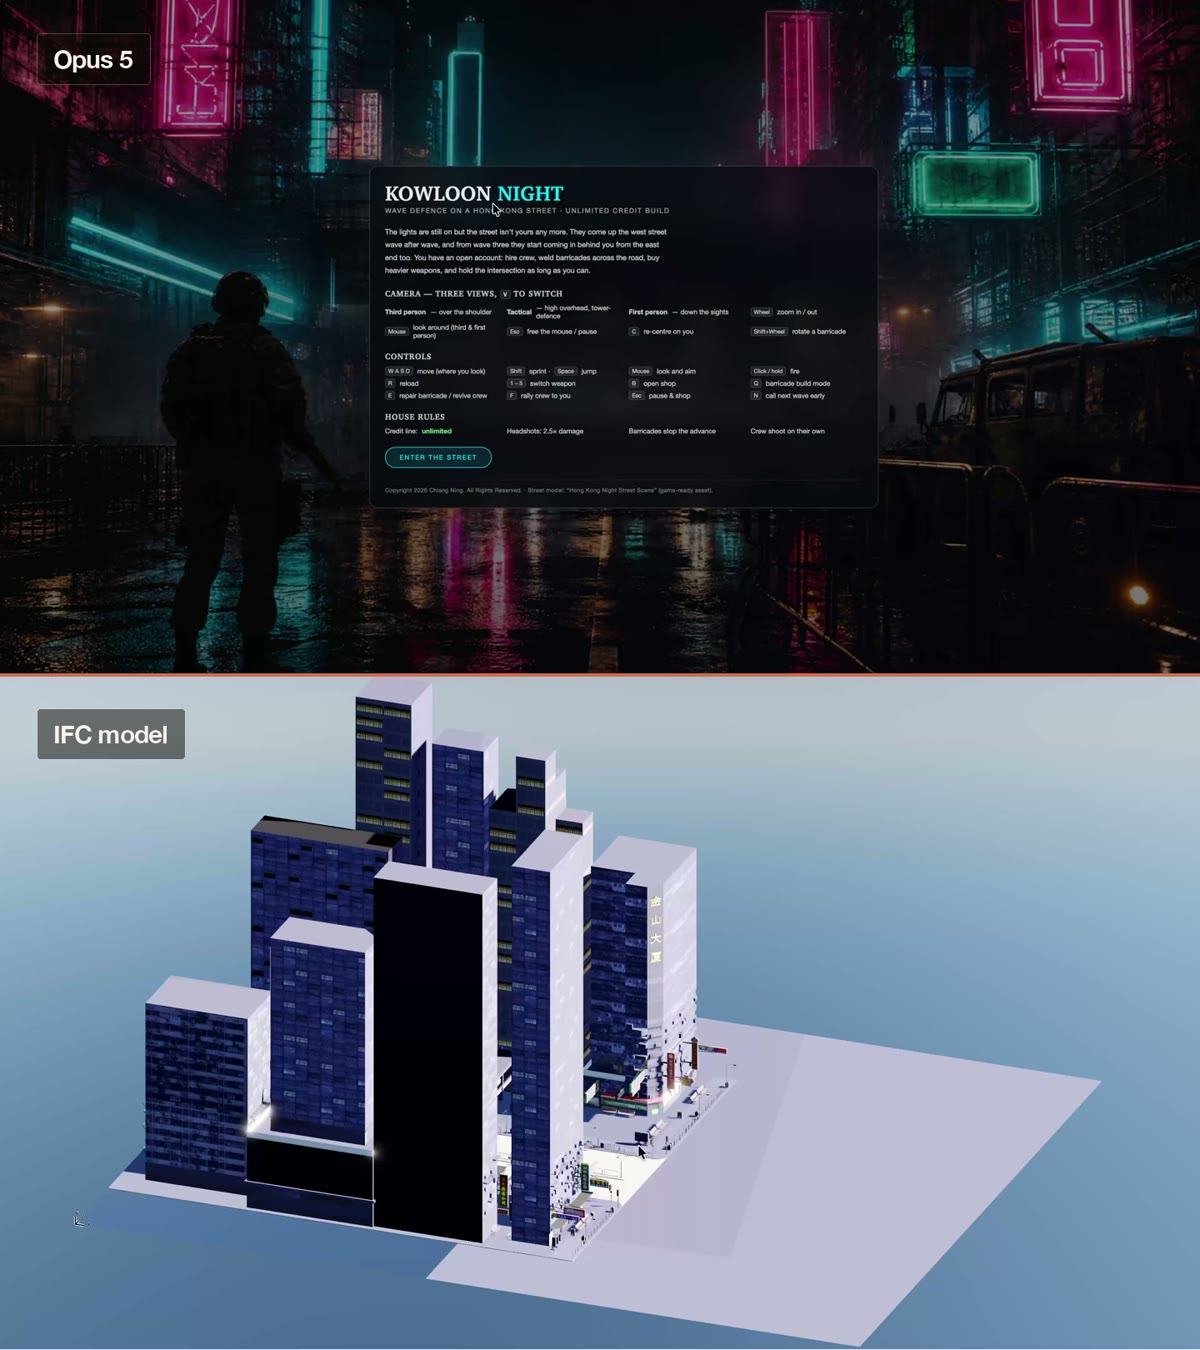
We build these models and then we barely walk through them.
A street gets modelled to death. Every awning, every sign, every bollard, every kerb upstand. Then it becomes four renders, a flythrough nobody finishes watching, and a folder nobody opens again.
Meanwhile the thing sitting in that folder is already a game level. It has walls that should stop you, a road with real lane widths, a choke point where the street narrows, and sight lines you deliberately composed. That is level design. You did it by accident, using the building code.
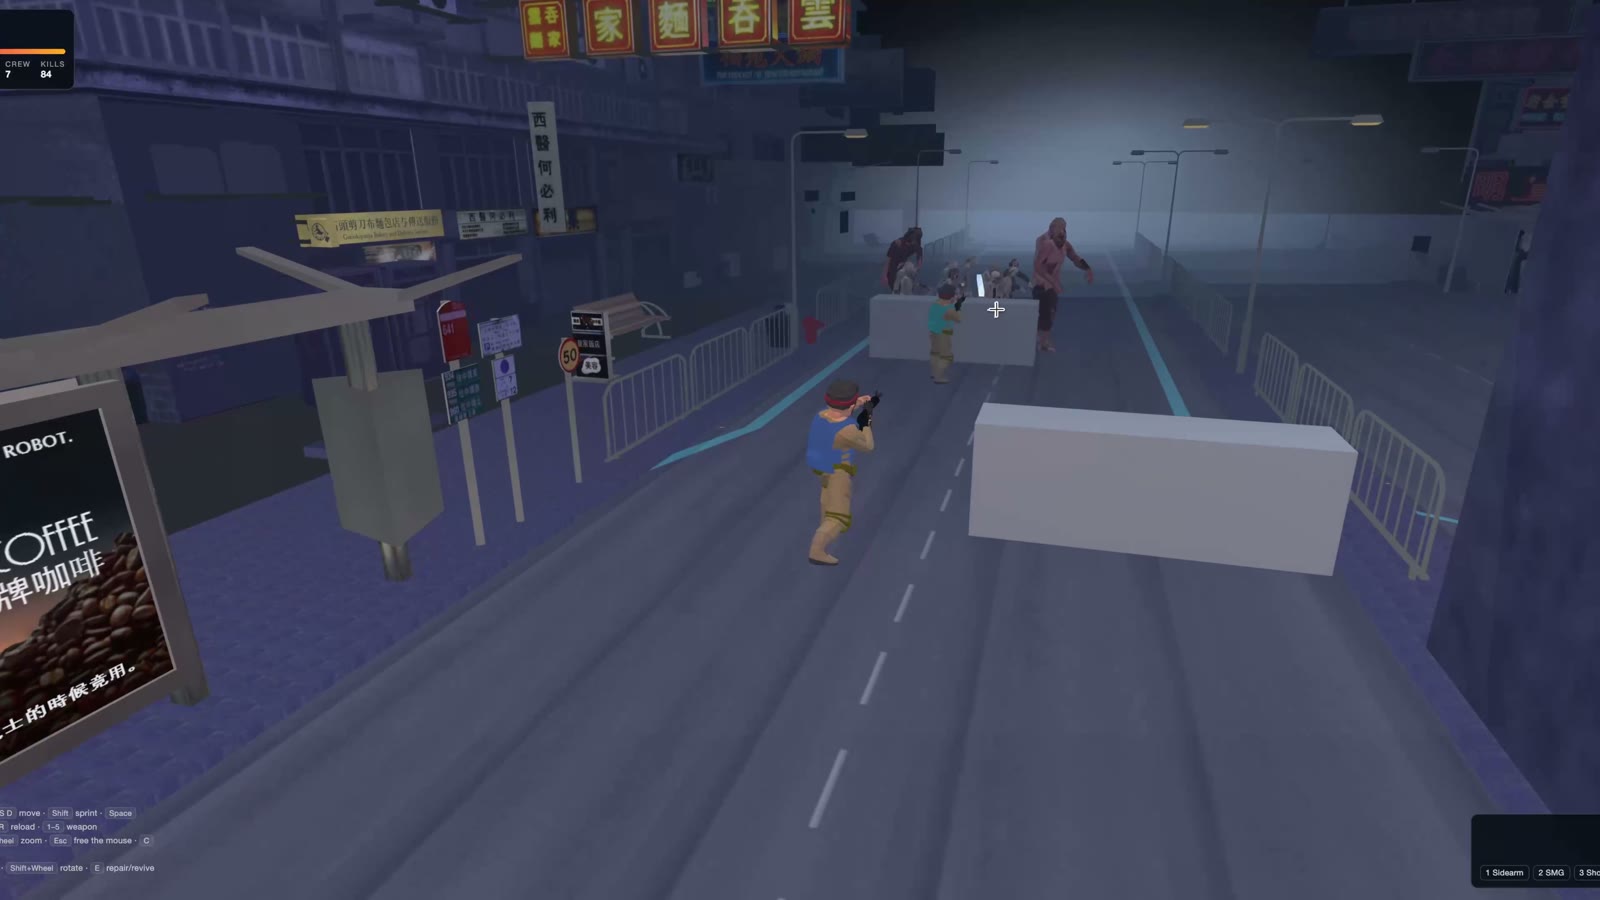
So I made mine playable. Kowloon Night is a wave-defence game on a Hong Kong street: you hold one neon-lit road against zombies pushing in from both ends, buying crew and barricades between waves. It runs in a browser, offline, with no engine and no build step. Opus 5 wrote all of it.
This is the actual pipeline, in the order I did it, with the prompts.
- The geometry · model it, or download it free
- Getting it out · the export nobody warns you about
- Three.js in a browser · the whole engine question, answered
- Free rigged characters · zombies and soldiers
- Two rigs that disagree about everything
- 46 free sound effects, and the 20 ms that ruins them
- Measure the real road · let the geometry set the rules
- Send it back · the game becomes a model again
Part one · the geometry
Step 01 · The modelModel it up, or download it free
This is the only step where being an architect is an unfair advantage.
Two routes in, and they are both legitimate.
Route A, your own model. Model the street the way you always do, then take it seriously as a surface: give it real materials with real texture maps, because untextured massing reads as a diagram the moment a character stands in it. This is the route if the point is your project. A client will forgive rough gameplay. They will not forgive not recognising their own building.
Route B, download one. Sketchfab has thousands of free CC-licensed models and a filter for game-ready, which is the filter that matters. Game-ready means triangulated, sanely named, textures packed, and a polygon count that a browser can actually draw. I used route B: a free game-ready asset called Hong Kong Night Street Scene, a 16 MB COLLADA file with about 150 textures.
Route B is the honest recommendation for your first one. Get something playable running on somebody else's geometry, learn where the sharp edges are, and only then spend three days texturing your own.
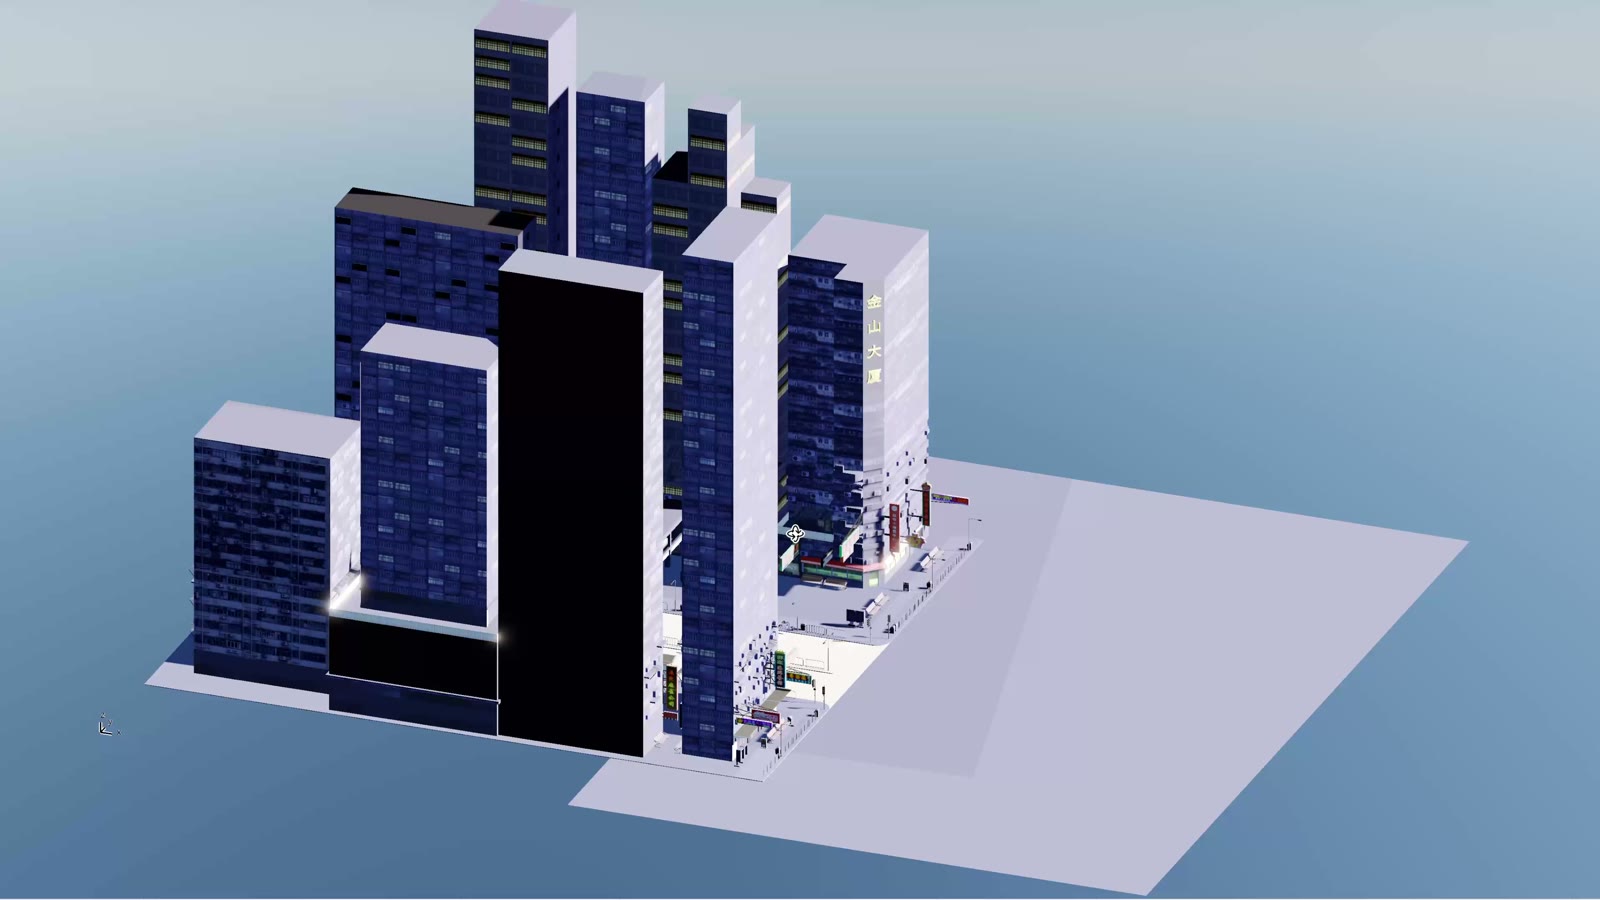
What to look for on Sketchfab: filter to Downloadable plus Free, then sort by triangle count, not by looks. Under about 600k triangles for a whole street is comfortable. Check the licence tab says CC0 or CC-BY, and check there is a glTF/GLB or FBX download, not only the original .blend.
Step 02 · Getting it outThe export nobody warns you about
Nine times out of ten the model is fine and the units are wrong.
Whatever it comes from, ArchiCAD or Revit or Sketchfab, you want glTF/GLB if you can get it and FBX or COLLADA if you cannot. Three of those load straight into a browser with no conversion at all.
Three things go wrong, always the same three:
Units. FBX is usually written in centimetres, OBJ carries no unit header whatsoever, and IFC is in metres. If your street arrives 100× too big, that is the import setting, not the file. Check it against something you know: a person is 1.78 m, a door is 2.1 m, a lane is about 3 m.
Edge lines. A SketchUp-derived model can carry thousands of separate edge objects that add nothing but draw calls. Mine had roughly 5,000. Strip them.
Object count. Expect the street to arrive as thousands of separate meshes rather than one tidy object. That is survivable, but it is why you keep it on its own layer and why you never try to clean it by hand.
I want to build a browser game on a 3D street model. First job is
just to get it on screen and measure it. Use three.js, plain
JavaScript, no build step, no framework, and serve the library
locally so nothing is fetched from a CDN.

THE MODEL
- File: [e.g. ./model/HongKong1.dae, a 16MB COLLADA with ~150 textures]
- Where it came from: [e.g. free game-ready Sketchfab asset / export
  from our ArchiCAD model]

WHAT I WANT
1. A local dev server and a page that loads the model, with a
   free orbit camera and a simple sky and sun so I can see it.
2. Print to the page: the bounding box in metres, the total
   triangle count, the number of meshes, and the ten biggest
   meshes by triangle count.
3. A click-to-measure tool: I click two points on the geometry
   and it tells me the distance in metres.
4. Tell me if the units look wrong. A person should be 1.78m and
   a traffic lane about 3m. If the scale is off by 100x or 1000x,
   say so and fix it at load rather than in the file.

Then stop. Do not start the game yet. I want to walk around it
and tell you where the playable area is.
Why it stops there: the measuring page is the single highest-value thing in this whole pipeline, and it is the step everyone skips. Later, every rule in the game is a number off this page. Skip it and you spend the next two days guessing why your characters clip through a kerb.
Part two · the game
Step 03 · The engine questionThree.js in a browser, and nothing else
The answer to "which engine should I use" is: none, for this.
Unity and Unreal are extraordinary, and both would have cost me the entire weekend in setup, import pipelines and a build. What I wanted was the opposite: something that opens in a browser, loads the model directly, and shows a change the instant I save the file.
So: three.js, served locally, four files. HUD and menus in index.html, the game in main.js, the character loader in characters.js, and a small Python dev server. Nothing is fetched from the internet, nothing is uploaded, and there is no build step at all. Double-click a command file and it plays.
This matters more than it sounds. It means every one of your models is a file away from being playable, and it means you can send the whole thing to a colleague as a folder.
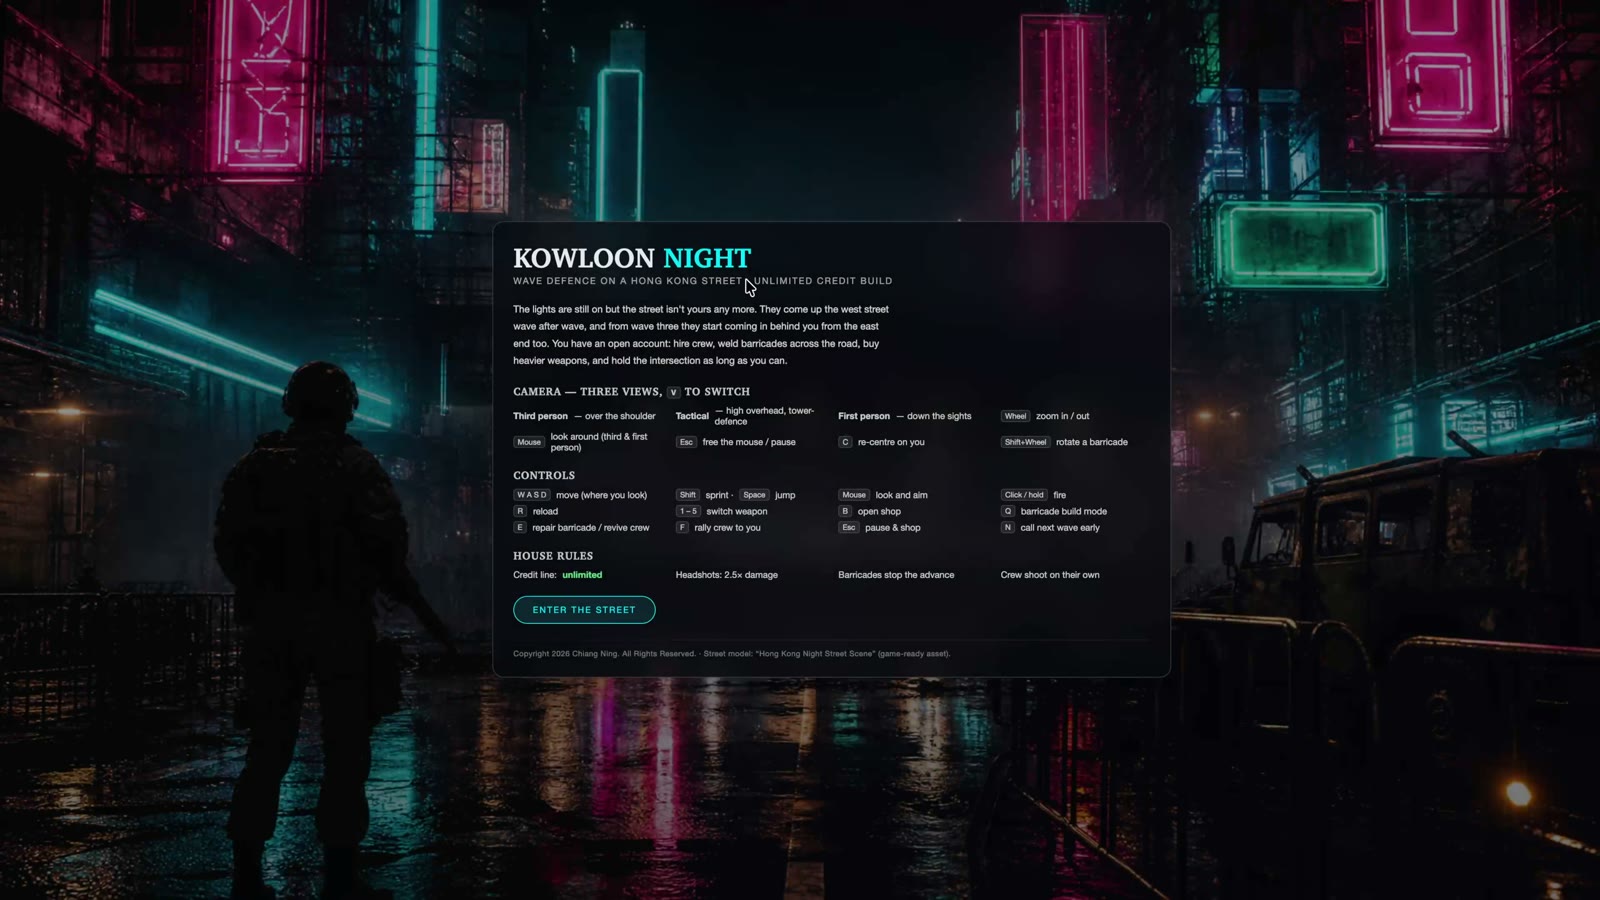
Here is the brief that produced the game. It is long, and that is the point: it names the shape of the thing, the views, and the rules, and it leaves the implementation alone.
Now build the game on this street. Same stack: three.js, plain JS,
local server, no build step.

THE GAME
A wave-defence game on one street. I hold the road against waves of
zombies and buy crew, barricades and weapons between waves. Credit is
unlimited from the start so it is fun before it is balanced, with a
switch to flip it to earn-per-kill later.

THE PLAYABLE AREA
Use the real road, not an arbitrary box:
- Playfield: [e.g. a 6m single carriageway in the west street opening
  into both carriageways, ~17m, in front of the camp]
- The choke point is [e.g. the narrow west street]
- Buildings, kerbs and railings are solid. Nothing walks through them.

THREE VIEWS, ONE KEY TO SWITCH
- Third person over the shoulder (default)
- Tactical, high overhead, for laying out barricades
- First person down the sights, with mouse-look

WHAT I CAN BUY
- Weapons: [SMG, shotgun, rifle, flamethrower that keeps them burning]
- Blockages: [sandbags, concrete barrier, spikes, electric fence, auto turret]
- Crew: [rifle crew, heavy gunner, medic, engineer who repairs mid-wave]

HOW WAVES ESCALATE
- They come from both ends. Early waves use only the choke point,
  later waves send a rising share in behind me.
- Waves grow 3-4 zombies each time, health scales ~20% per wave,
  new types every few waves, a bigger horde every fifth wave.
- A wave advances as a broad front, each one holding its own lane,
  not a single-file queue down the centreline.

RULES FOR YOU
- One playable thing at a time, and tell me what to press to test it.
- No placeholder cubes for anything I can see. Use the real model.
- Keep the frame rate playable on an integrated GPU. If something is
  too expensive, say so and offer the cheaper version.
The rule that did the most work: "one playable thing at a time, and tell me what to press to test it." It turns a 3,000-line build into twenty things you actually played. The other one that earns its keep is asking for the cheap alternative when something is expensive, because the honest answer to a lot of graphics requests is "yes, at nine frames a second".
Step 04 · CharactersFree rigged models, and why you must not model these
You can model a street. Do not model a human that has to walk.
A rigged, animated character is a completely different discipline from architectural modelling, and there is no version of learning it in a weekend. Both of my character packs were free downloads:
| What | Pack | What you get |
|---|---|---|
| Zombies | PolyArt Zombies with Animations, free pack | Ten variants, all with a baked shamble animation |
| Soldiers | Lowpoly Soldier | One rigged body, Mixamo skeleton, detailed M4 |
| Props | DAE 5 Finished Props: Forest Loner | The jeep, workbench and clutter that anchor the camp |
Two decisions here saved the whole thing, and both are the kind of decision an architect makes about a drawing set every week.
One body, five colours. Every human in the game is the same soldier model. You tell the team apart by armour colour: you are blue, rifle crew olive, gunner orange, medic white, engineer cyan. Only the armour and webbing materials get tinted, so faces and boots keep their own texture. One model, five roles, no extra downloads.
The rifle is a scale problem. That detailed M4 is 84,000 triangles on its own. Nine crew carrying it would have cost more geometry than the entire street. So the player carries the real one and the crew get a simple stand-in. Nobody has ever noticed.
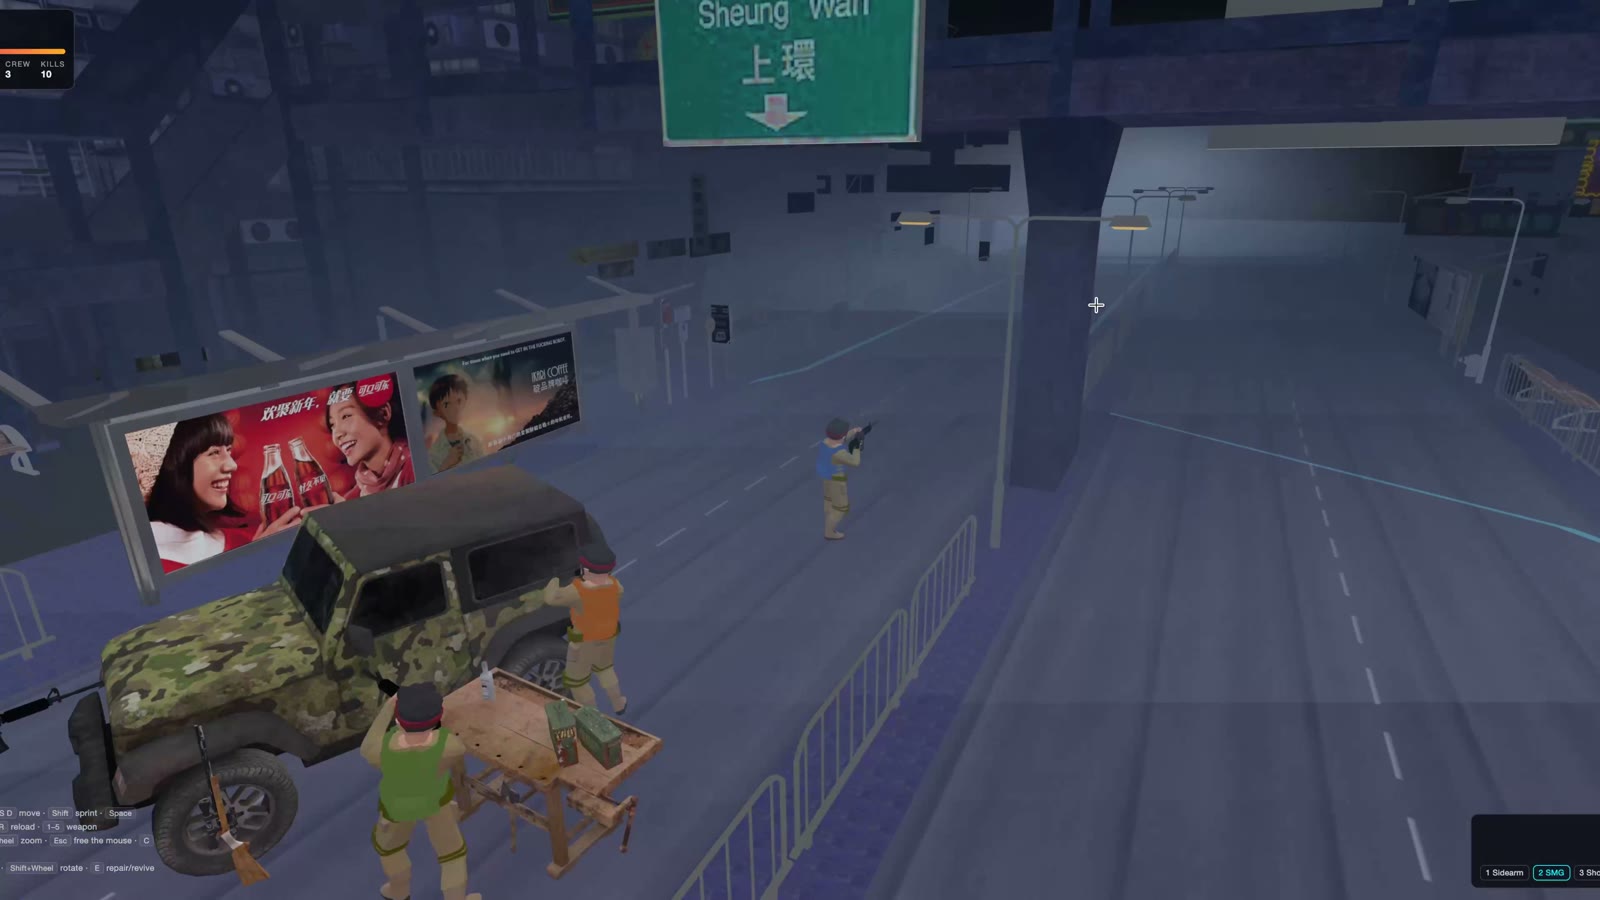
Bring in the character packs. They are already in the project
folder, both free downloads, both rigged with baked animations.

THE PACKS
- Zombies: [path] — [10 variants, each with a walk/shamble clip]
- Humans: [path] — [one rigged soldier, Mixamo skeleton]

WHAT I WANT
1. Load them directly. Do not convert the files if three.js can
   read them as they are.
2. Split each pack into templates I can clone cheaply, so 30
   zombies on screen is 30 instances and not 30 file loads.
3. Play each character's own baked clip, and scale playback speed
   to how fast it is actually moving so nothing ice-skates.
4. Use ONE human body for every role and tint only the armour
   materials per role: [player blue, crew olive, gunner orange,
   medic white, engineer cyan]. Faces and boots keep their texture.
5. Report each model's triangle count before you place it, and
   flag anything expensive enough to need a cheaper stand-in.

IF A CLIP IS MISSING
Say so, and pose the skeleton in code instead of faking it with a
clip that does not fit. Tell me which bones you are driving.
Step 05 · The rig trapTwo skeletons that disagree about everything
This is the one genuinely fiddly part of the whole build, so here it is in full.
Two free packs from two different sources means two rig families, and they agree on almost nothing:
Which way is forward. The zombie pack, a 3ds Max biped, faces −X in its bind pose. The Mixamo soldier faces +Z. Wire them the same way and half your cast walks sideways.
Bone names. Biped bones carry a per-character numeric suffix, bip_L_Thigh007. Mixamo uses mixamorigLeftUpLeg. Any code that assumes one naming scheme silently does nothing on the other pack.
Mirroring. On the biped packs the arm frames are mirrored across the body, so the right arm needs the negated angle while legs and spine do not.
The fix is not clever, it is just honest bookkeeping: describe each pack in a small profile rather than assuming a standard, and let the code read the profile.
And the soldier had no walk cycle at all. Its only baked animation is a reload. So the humans are posed in code: a stride that scales with speed, knees bending on the trailing leg, feet rolling, a slight forward lean, a breathing sway when standing still. The arms are deliberately left alone, because the model is bound holding its rifle in both hands and rotating the arms breaks the grip.
Nothing in that paragraph is game development. It is coordinating two consultants who used different conventions, which is Tuesday.
Part three · the finish
Step 06 · Sound46 free effects, and the 20 ms that ruins them
Sound is the cheapest realism you will ever buy, and the easiest to get wrong.
Every sound in the game came free from Pixabay, whose content licence allows commercial use with no attribution required. Forty-six files: nine guns, three zombie families, hits, headshots, reloads, brass on the road, hammering, a cash register, an air-raid siren, a heartbeat, and a thirty-second city-night ambience bed under all of it.
Free stock audio is never ready to use as downloaded. Four passes fix it:
Trim to the transient. This is the big one. Raw stock files carry anywhere from 30 ms to 4.5 seconds of leading silence. On a gunshot bound to a mouse click, that silence reads as input lag, and it feels like a broken game rather than a slow file.
Cut long takes into single events. One 51-second take of grunts became four separate player-hit sounds. One hammering recording became three strikes. Variation is what stops a repeated sound sounding like a bug.
Peak-normalise per family. A dozen of my raw files decoded above 0 dBFS. Normalise them to a target per family and the gain numbers in the code start meaning something.
Crossfade-loop the beds. The ambience and the flamethrower loop need a crossfade or you hear a tick every cycle, and once you hear it you cannot stop hearing it.
Add sound. I have downloaded free effects from Pixabay into
./audio. Assume they are raw and unusable as-is.

PROCESS EVERY FILE
1. Trim the leading silence to the transient. Some have up to
   4.5s of it and it reads as input lag on a mouse click.
2. Cut long takes into single events, and give me numbered
   variants where one file holds several usable hits.
3. Peak-normalise to a consistent target per family (guns,
   zombies, impacts, UI) so my gain numbers mean something and
   nothing clips the master limiter.
4. Convert to mono 44.1kHz, except any stereo ambience beds.
5. Crossfade-loop anything that loops, so there is no tick.

WIRE IT UP
- One master limiter. Nothing clips.
- Randomise between variants, with slight pitch variation, so a
  repeated sound does not sound like a bug.
- 3D positioned audio for anything with a location on the street,
  so a fight at the far end sounds like it is at the far end.
- A continuous ambience bed, plus occasional far-off one-shots
  [e.g. a distant siren, a dog barking].

Then write a CREDITS file recording where every file came from
and the licence it is used under, even where attribution is not
required. I want the provenance on record.
The credits file is not optional. Attribution is not owed under the Pixabay licence, but provenance is the difference between an asset you can defend using and one you have to go and re-source in two years. Same reason we keep the source of a detail we borrowed. Write it while you still remember.
Step 07 · The good partLet the geometry set the rules
Here is where being an architect stops being a novelty and starts being the actual advantage.
The best decision in the whole build was refusing to invent the play area. Every rule came off the measured model instead.
The west street is a single ~6 m carriageway, so it is the choke point. One concrete barrier piece is 3.2 m wide, so two pieces side by side seal it exactly, and a sealed wall holds a mid-game wave for about thirty seconds before the first piece breaks. The east end opens to both carriageways at roughly 17 m, so it needs five pieces, or you leave it open and cover it with turrets.
None of that is game balance. It is a road width, a barrier length, and division. The street was always going to play like that, because it is that shape.
This is the part that does not transfer to someone who is not us. A games designer would have drawn a corridor and tuned it until it felt right. We already had the corridor, at true size, with its narrow end and its wide end and its awkward setback, because someone documented it. Reading a plan and knowing where the pinch point is is the skill.
Step 08 · The round tripSend the game back as a model
The step that turns a toy into something a practice can use.
A game the office cannot open is a party trick. So the last thing I built was the way back: an exporter that writes the whole scene, street, characters, jeep camp and all, out as FBX and OBJ so it merges straight into ArchiCAD at true size.
It is a real export, not a screenshot. Object names survive, so the ArchiCAD element list reads Zombie_lpMale_zombie_A, Squad_medic, Jeep, Workbench. The characters land in bind pose, lined up on the wide carriageway clear of the playable road. A soldier measures 178 cm and the jeep 196 cm, verified, so a unit-aware importer places it right.
There was no FBX exporter available and no converter on the machine, so Opus 5 wrote FBX 7.3 ASCII directly, then verified it by reading its own output back before handing it over: 32 meshes and 184,339 triangles written, 32 meshes and 184,339 triangles read back, 17 materials, every texture reference resolving.
That verification step is the one I would insist on in any prompt from now on.
Now write the way back. I want the game scene as a model I can
merge into [ArchiCAD / Revit] at true size.

WHAT TO WRITE
- [FBX and OBJ], plus the material files and a texture manifest.
- Everything triangulated, in world coordinates, no instancing
  and no transforms left to chase.
- Keep object names so the element list is readable
  (Zombie_A, Squad_medic, Jeep, Workbench).
- Characters in bind pose, lined up clear of the playable area.
- Write real units in the header and tell me which unit to pick
  on import if the format cannot carry it.

VERIFY BEFORE YOU HAND IT OVER
Read your own output back with a loader and compare mesh count,
triangle count, material count and every texture reference
against what you wrote. Report both numbers. If they do not
match, fix it before telling me it is done.

If a format is genuinely unsupported by my CAD tool, say that
plainly instead of producing a file that opens empty.
What it actually costs
| Ingredient | Source | Cost |
|---|---|---|
| The street | Free game-ready Sketchfab model, or your own project model | Free |
| Zombies and soldiers | Free rigged character packs | Free |
| Props | Free prop pack | Free |
| 46 sound effects | Pixabay, commercial use, no attribution required | Free |
| Engine | three.js, served locally | Free |
| The code | Opus 5, one long weekend | A subscription |
No engine licence, no plugin, no asset store, no cloud service, no CDN. It runs offline as a folder.
Why any of this is worth a practice's time
Not because clients want games. Because of what happens when a model becomes walkable at eye height under someone else's control.
You find out immediately which spaces are legible and which are not. You find out that the sight line you composed only exists from the render camera. You find out that the footpath everyone has to use is 1.4 m wide behind a bin store, that the entry is invisible until you are past it, and that your beautiful colonnade is a corridor with nothing to look at. A flythrough hides all of that, because a flythrough is you driving.
Games are just the most demanding version of that test, because a game will not let you look away.
A render is you showing someone where to look. A game is finding out where they actually go.
Building a tool rather than a game is the same skill with a shorter weekend: the wall type builder is a real one, built in an evening, with the prompts.
The part that does not download
All of this clears the assembly. The loading, the rigs, the audio pass, the export nobody wants to hand-write.
It does not decide that a street is worth testing this way.
It does not know which pinch point will matter to the people who use the building.
It does not tell you what your model is actually for.
That half stays yours. The weekend it used to take does not.
All 5 prompts above are free to copy, no email wall. Comment "IFC" and I will share how I did it, prompts included, for the version that runs on your own model.
Copyright 2026 Chiang Ning. All Rights Reserved. Street model, character packs and props are free third-party assets used under their own licences; sound effects from Pixabay under the Pixabay Content Licence.